|
What the electric toaster did for breakfast, the Live Composite feature on recent Olympus cameras has done for capturing star trails and other long exposure photographs. Putting a slice of bread on a stick and holding it over an open fire can still yield a great piece of toast, but it's challenging, time consuming and very inconvenient. Taking a hundred photographs, uploading them, adjusting exposure and stacking them to create a star trail image is pretty much the same - challenging, time-consuming, and to me, very inconvenient.
Enter, Live Composites. If you are unfamiliar with the technology let's break the idea apart (sorry if this reminds you of your high school English teacher);
Therefore a live composite image is one made of several separate photographs that are combined in the camera over a period of time. You can find this feature on the following camera models; All of the images in this blog post were shot using the E-M1 and the E-M1 Mark II. 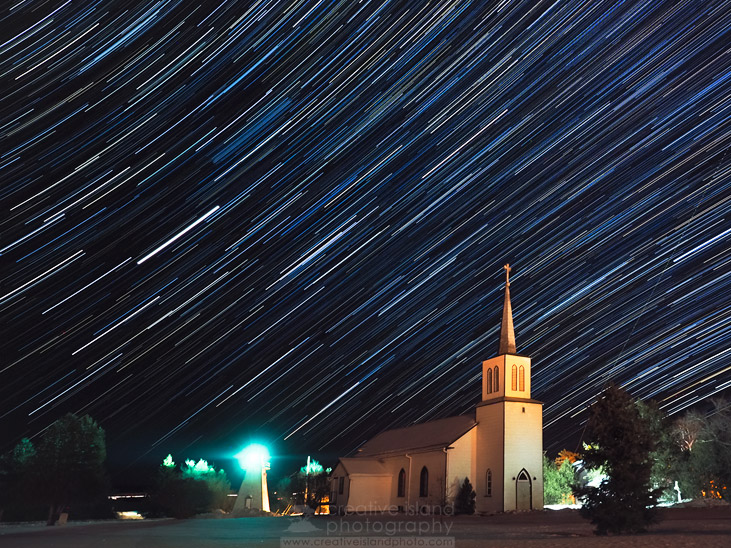
The photograph above was created over the course of 40 minutes. I set up the camera to take an exposure every 4 seconds. As the stars moved across the night sky these pinpoints of light changed position, were recorded by the camera and created the resulting star trails. After the initial 4-second exposure, the subsequent exposures only record areas of the image that change brightness. This prevents the very bright areas of the image, i.e. the buildings, from being over-exposed.
With other camera systems, creating this effect requires a number of steps;
The Live Composite setting on the Olympus OMD definitely simplifies that process. 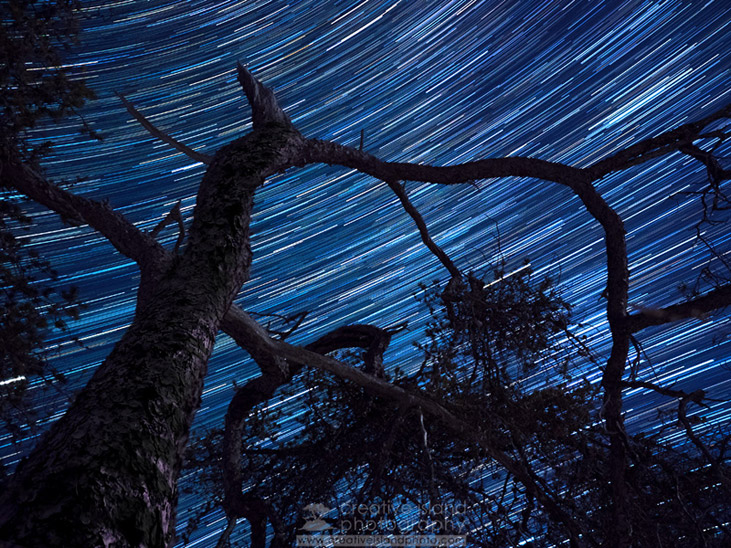
Using Live Composite
The idea of building a composite image right in camera was completely foreign to me and therefore definitely required some experimentation, and some trust that it would actually work. As you can see, it really does work! Here are the basic steps.
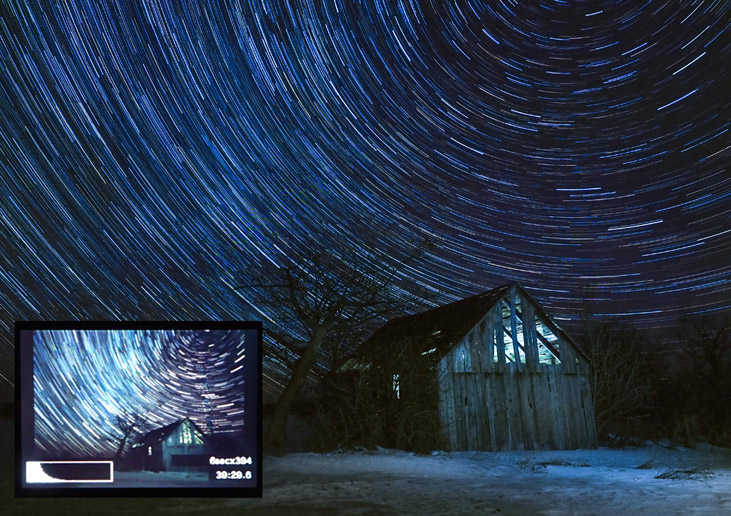
During the Live Comp captured above, I grabbed my Olympus Tough camera and snapped an image of the LCD. In the bottom right of the inset photo you can see that it had stacked 394 6-second exposures over the course of just under 40 minutes. (The inset was a handheld photo in the dark so please excuse the rather blurry presentation.) Over the course of that capture I also used my headlamp to light-paint the interior and a bit of the exterior of this old shed. TIP - If you are going to do any light painting, do it at the start of composition. If you don't like the result you see, you can always stop the current exposure and start again.
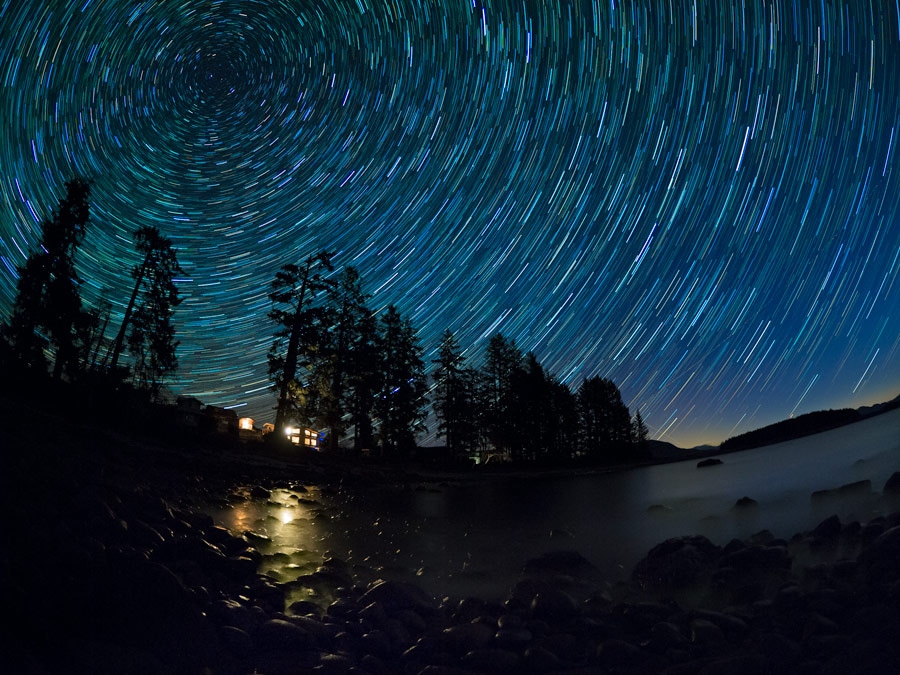
A small amount of light from this seaside cottage helped to add some dimension to this shot. (E-M1 Mark II, 8mm f/1.8 fisheye, ISO1600, f/1.8, base exposure 20s, total exposure, 45 minutes)
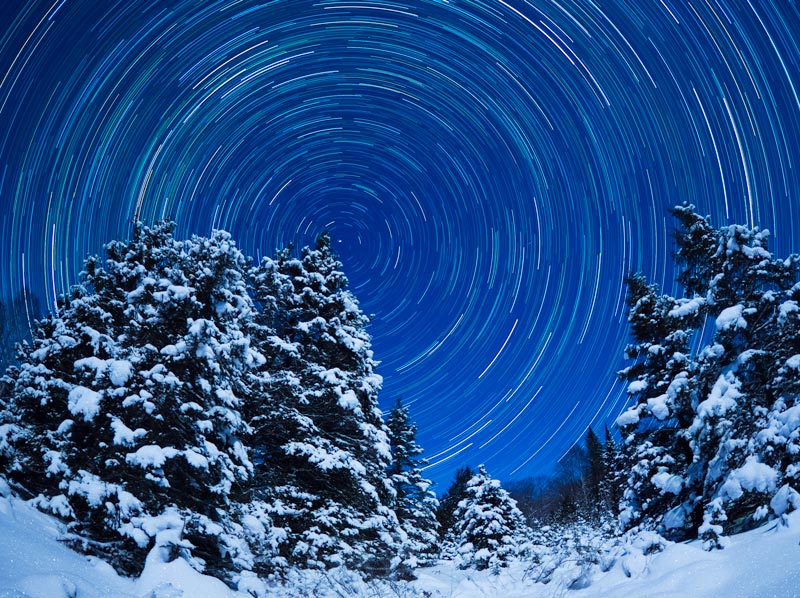
A moonlit night illuminated the snow-covered trees. The Olympus 8mm fisheye lens allows for the capture of a wide expanse of sky.
For this image I started live composite about an hour before the moonrise, then stopped the sequence just after it appeared to prevent too much lightening of the image. (E-M1 Mark II, 8mm f/1.8 fisheye, ISO1600, 25s @ f/1.8)
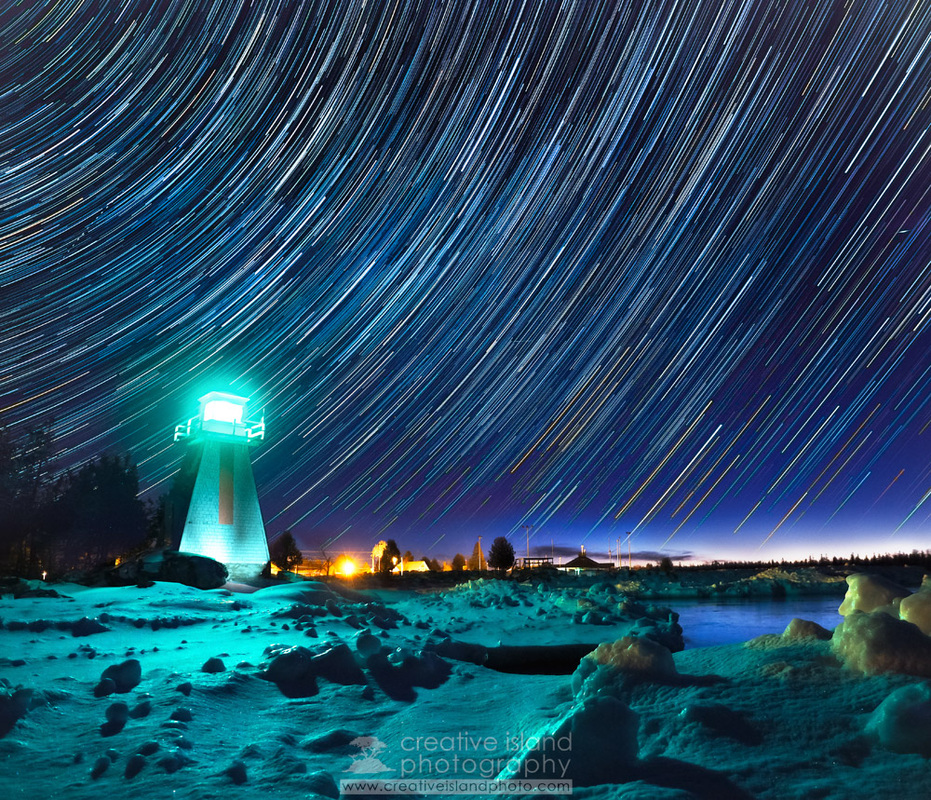
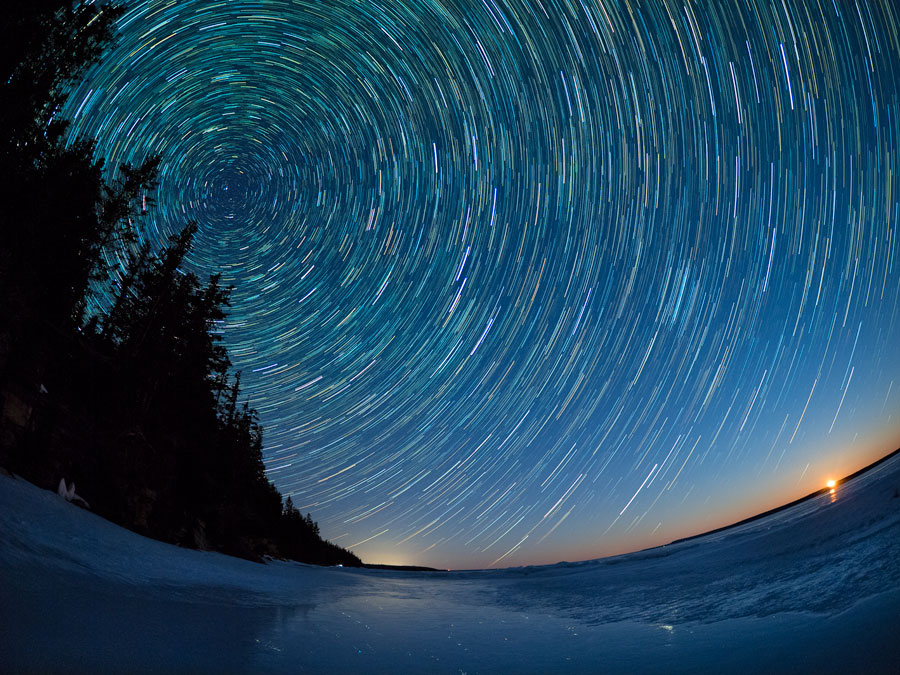
A star trail image done in the traditional way would be very challenging given the amount of light coming from this old range light. The Live Composite feature only stacks changes in brightness from the original exposure.
Get Creative
This feature is not just for capturing star trails (although you'd be forgiven for thinking that considering the photos I've presented here).
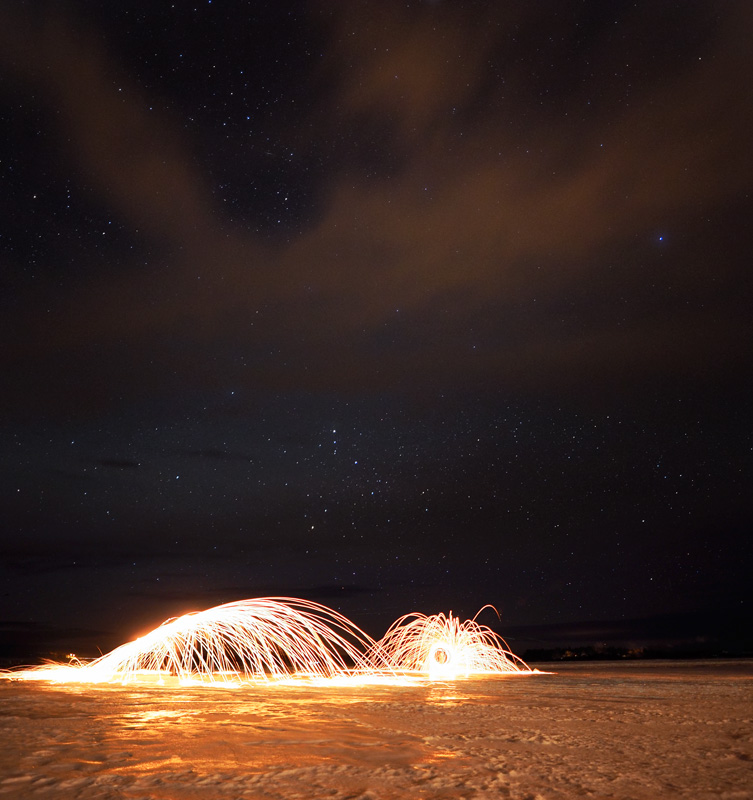
This image is a "Live Composite, Double Exposure, Panorama". When I shot the spinning steel wool it was a cloudy evening. The next morning I woke early, returned to the same location and created the double exposure under clearing skies. I tilted the tripod head upwards and photographed more of the sky. Then I stitched the two images together in Photoshop to create a vertical panorama.
Post-processing
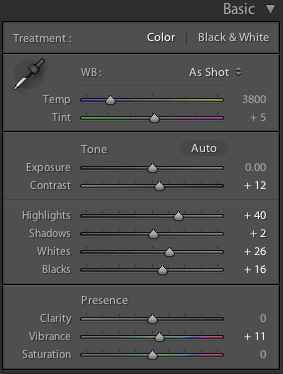
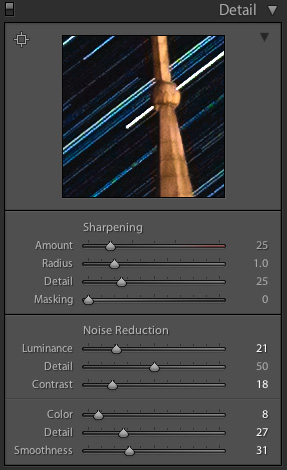
As incredible as the Live Composite feature is, you may still find that a little bit of post-processing is in order. I use Adobe Lightroom. The screen shots below are for the first photo in this post.
One Final Note
...and on a completely different subject. Olympus prides itself on the fact that the E-M1 is "dust, splash and freeze proof". I had my doubts that it could handle shooting for well over an hour in -20 C temperatures. Well, it did. And with great results!
UPDATE!
Since writing this post, I have found many other uses for the Live Composite feature. Check out a more recent post that looks at using Live Composite for capturing traffic trails, lightning, fireworks and much more. When you have a good grasp of how the feature works, it's time to move beyond the stars!
164 Comments
John O'Connell
1/30/2015 10:25:25 am
Excellent.Thanks for publishing this.
RAM SUBRAMANIAN
2/1/2015 05:48:56 am
Thanks! This is the most useful blog I have ever seen on Live Composite! BTW, its also available on OMD EM5. (the camera I own)
Peter
2/1/2015 07:19:21 am
Thanks, Ram. I glad you found it useful. I will also update my blog to reflect the fact that LiveComp is on the E-M5. All the best!
satish
11/1/2015 10:51:23 pm
I could not find the live composite on the OM-DEM5!! Where is it ?
Steve
7/13/2016 04:25:03 pm
What iso setting
Mon
2/11/2015 12:02:54 am
I have an EM5 with 2.0 firmware. It has no live comp, only live bulb and live time.
Peter Baumgarten
3/11/2015 10:05:09 am
Thanks, Joe. I have just updated the list of cameras - I took out the E-M5 and added the Mark II. I definitely know it is on that camera! Cheers.
Dave Kosiur
2/18/2015 06:46:58 am
Great coverage! Just what I needed to learn about Live Composite and star trails.
Dave Kosiur
2/18/2015 06:47:13 am
Great coverage! Just what I needed to learn about Live Composite and star trails.
Dougal Topping
3/11/2015 02:40:45 pm
After reading this article I thought I'd try it over the city of Perth in WA & it worked a treat and I found that I didn't need a high iso (iso was 300)
jim carlson
3/12/2015 05:13:26 pm
What ISO were you using? Very helpful post. Thanks!
Peter Baumgarten
3/14/2015 10:45:46 am
My ISO ranges from 800 to 1600 depending on the lighting conditions. For those images with a bit of light pollution I usually shot at 800 to 1000. Hope that helps. Cheers!
Jim
3/16/2015 04:49:03 pm
Another question: In your "how to" you said that your first exposure was 4 sec. and the rest were 10. Is there a way to change the time once the composite has started or did you somehow preset the two different times?
Agnieszka
7/8/2015 08:57:57 pm
Jim, it would seem to me that the 4 sec exposure was for the image with the house. the 10 sec exposure was for the "second" image - the tree. That is, for the first image, all photos were 4 sec. For the second image, all photos were 10 sec. This is what i understood from "first" and "second" in this context. Hope that helps.
Robin
12/9/2015 02:47:18 pm
Hi Jim - I have the same question. Did you find the answer?
michael
3/23/2015 04:17:03 pm
Great coverage! very helpful. once question regarding the Live Composite on mark ii. I had a Mark ii and i couldn't get to the live composite mode by dialing the shutter speed all the way to the extreme left, I can only see the BULB and Live Time in M mode. Not sure what step I missed.
Peter Baumgarten
3/24/2015 12:24:53 am
Hi Michael. Thanks for the comments and the read. LiveComp is definitely on the E-M5 Mark II and it is accessed in the same way (dialling all the way to the left in Manual mode). It is not on the older E-M5 (Mark I).
Jim
4/7/2015 11:35:54 am
Do you set NR to On, Off, or Auto, or does it matter? Thx!
Hi Jim. I always have my NR On. Cheers.
4/20/2015 11:45:14 am
Ian Besch
4/27/2015 09:53:28 am
Great article Peter, thanks. This is a function on my OMD-M1 of which I was unaware - it's not mentioned in the PDF camera manual which I have! I wonder how many other hidden gems can be found on this camera...?
Robert
5/12/2015 09:48:19 pm
Hi, 5/28/2015 09:33:29 pm
Great post man! 8/15/2015 02:13:12 pm
Make sure the E-M1 body firmware version is 2.0 or greater.
joylene lee-archer
6/25/2015 12:34:55 am
i have been learning how to set the EM1 to do star trails .. reading what is written here is a great learning curve.. i would like to print it out but too much ink
h petersiel
6/26/2015 01:15:46 pm
I took some the other night.The basic scene(before any airplane light trails crossed)was 1/2 sec at F/8.What exposure does the camera do on the light trails or any other light that enters/eminates from the subject area?Same 1/2 sec?Thanks
joylene Lee-archer
6/26/2015 02:49:58 pm
thank you for that info.. i am hopefully going to try it tonight Weather permitting
Richard
7/1/2015 09:27:17 am
Could it work in daytime thunder storms? Maybe still need an ND filter to slow things down?
Jim
7/3/2015 06:41:40 pm
I tried it once at night for a lightning storm and the results were horrible. The clouds were a blurry mess. Have used it many times for star trails with fantastic results. Good luck!
Richard
7/5/2015 06:41:34 am
Thinking about it, I could imagine it. I had a good lightning shot once on single exposure film, but so long ago I don't remember settings or if I was just lucky to press at the right moment. It was over sea, taken from a vantage point that was not being rained on.
Jim
7/5/2015 08:00:23 am
All you can do is try, right? Let us know your results if you do, please.
joylene lee-archer
7/8/2015 10:28:29 pm
I am still waiting to do star trails but the weather here in South Australia has not bee too good to us have to travel out into the county to do it but at the moment it is looking to rain again all week end.. will notify when i get to do it
Michael
7/23/2015 05:15:09 am
Hi,
Peter Baumgarten
7/24/2015 01:56:59 am
Hi Michael. For all of these photos I used the Olympus OMD E-M1 with the 12mm prime lens. Just like for regular night sky shooting it is important to have a fast lens. I had the lens wide open at f/2.0. Cheers!
Jim
7/23/2015 08:57:57 am
Yes, with star trails you still want a fast wide angle lens using a wide open aperture and high-ish ISO as a general rule. However, you may still need to tweak those settings to get the best results.
William Prip
7/25/2015 01:54:11 pm
Peter, thanks very much for this tutorial. I have one question that's not already covered above: what AF setting would be best? I tried using live comp for the first time the other day and I used manual focus on some branches to do a star trails shot. But, what about other situations when there's nothing obvious to focus on or focusing is difficult because it's just too dark? Do you use auto focus and hope that the camera focuses on each instance of new light (like lightening or fireworks)? Thanks!
Peter Baumgarten
7/25/2015 11:32:08 pm
Hi William. The auto focus settings work poorly because of the darkness. Switch over to manual focus and set it to the infinity marking on the lens. Just make sure that your nearest subject (like the branches you spoke of) is not too close or they will be blurry. Hope that helps. Cheers!
Roger Buenzow
7/7/2019 08:36:17 am
Take a look at PhotoPills -https://www.photopills.com/articles/milky-way-guide
Andrew Morgan
8/12/2020 06:21:51 am
Now we can use Starry Night autofocus on the E-M1 Mk3!
Stephanie
8/10/2015 12:50:50 pm
Hi Peter,
Martin
8/10/2015 02:02:34 pm
I have an OMD E-M1 but didn't know this feature even existed! I found your night sky and church shot so inspirational I'm definitely going to give this photographic modality a try. Thanks for a great article and idea! 8/11/2015 06:17:35 am
Thanks for the post. I have tried with mixed success to use livecomp since it is one of the reasons I bought the E-M5II. I still find that I have too much light on well lit subjects and too little light on dark subjects. Taking tests shots is a great suggestion. I have constantly been in a quandary as to how long to time the shots. Your post is the most helpful one I have seen, and I appreciate also the website mentioned in another blog where I can find ares with less ambient light. 8/11/2015 01:35:15 pm
Great encouragement to get out and try these techniques! Thanks for taking the time to write it all out, with lots of images to show also. Have you ever tried any astrophotography through a telescope? My next project will be to attach my Canon to my Celestron! 8/15/2015 02:15:30 pm
No mention of turning off the Image Stabilization (IS).
joylene Lee-archer
8/15/2015 02:40:10 pm
Yes it says to turn off the image stabilization to do Star trails.. but i forgot the other night while i had about 1 hour of almost clear sky's.. it also says to set you camera on Tungsten as well and set for about 20 or 25 seconds.. i had mine at 8 seconds .. picture was very dark so i don't know what i did wrong .. I did get the star trails but because i had not turned off the stabilization there were gaps in some of the stars
Jim Carlson
8/15/2015 03:31:39 pm
In regards to WB, I much prefer a Kelvin setting of 3500-3700 for stars and Milky Way. Tungsten, in my opinion, gives too much of a blue cast. Of course, WB can always be corrected in PP.
joylene lee-archer
8/15/2015 03:53:45 pm
thank you for the info Jim.. i now have turned off the Tungsten
Jim Carlson
8/15/2015 04:32:10 pm
I think you'll like the results of the Kelvin setting. You mentioned that the image was dark; do you remember your f-stop and ISO settings?
joylene lee-archer
8/15/2015 04:57:08 pm
F.3.5 8 seconds ISO 1600.. on live comp.manual and manual focus
Jim
8/16/2015 12:23:52 pm
Bump up your ISO 3200 and you should see a brighter image. And if your lens goes to 2.8, start there. Is it a kit lens?
joylene Lee-archer
8/16/2015 03:01:23 pm
Hi Jim.. No it's not a kit lens.. Pro lens 12/40mm 2.8.. I did one mucking around last night in the back yard and as you know there is a lot of light around.. the first one i did was 2.8 20 sec 1600 ISO it was that light i only did it for a couple of shots the compensation shot +5.. the second one i changed the compensation into the middle and that was shot on 5.6 20sec 1600 ISO again only a couple of shots.. the third one i did by moving the compensation to -1 still very bright but did it for 45 mins on F8 20 sec 1600 ISO.. i will go out into the country as soon as the weather is good as we are having lots of rain and clouds.. I too a chance out the back yard to see what would happen.. I also want to do the milky way can you please advise what setting it would be... thank you also for your help.. Joy
Roger Buenzow
7/7/2019 08:41:06 am
How to you get an ISO setting of 3200 in LIVECOMP? The highest I can get is 1600. What am I doing wrong. When I am in BULB I can change the ISO to what ever I want i.e. 16000 when I switch to LIVECOMP the ISO automatically goes back to 1600.
Jim
8/18/2015 09:52:51 am
Don't be concerned with Exp Comp for astrophotography, because you're not really compensating for anything. Keep it simple; F-stop, ISO, and shutter time. And you should never be above F3.2 when shooting the night sky. Actually it's usually best just to set it at 2.8 and leave it. The idea is to gather as much light as possible.
joylene lee-archer
8/18/2015 01:05:17 pm
Thank you Jim.. i will see how i go when i get to Colorado in a couple of weeks time will check out the lens that you said.. I also have 2 Canon 7D's so will give it a try as well .. I have a 10/20mm and a 10mm fish eye for the 7D's so will try both those out as well
Jim
8/18/2015 05:00:11 pm
Okay! Let me know how it goes. Where in CO are you heading?
joylene lee-archer
8/19/2015 01:50:06 am
i will be in Colorado springs all around there for 28 days doing the Durango/silverton Fall Special train trip.. then heading to Charma NM..
Jim
8/19/2015 02:37:02 am
Whoa! That's going to be an amazing trip. I live in Ft. Collins, so get to spend a lot of time in RMNP. Nice dark skies.
joylene Lee-archer
8/22/2015 02:20:17 pm
Morning Jim.. went out into the country last night Hamely Bridge SA AU.. the star shots i got were good i would not say great.. as there were a lot of cars going over the new bridge and we were under the old bridge in the gully.. the stars turned beautifully in the first one but the car lights from above affected it .. i let it run for 1 hour plus perfect circle.. so then i moved it up further into higher ground where the car was parked and point the camera that way away from the head lights.. 1 hour plus on the next photo was a good one but the stars did not turn just came on an angle straight down. there was a lot of frost on the ground which fogged up the lens and the camera and tripod was dripping from the frost.. any reason why the stars did not turn or is that normal to go straight down.. I tried to change the OMD 1 to 3200 ISO but could not get it past !600... will have to check the manual again how to move it . I hope you don't mind the emails cheers Joy
Jim
8/23/2015 04:29:39 am
You were in Australia? In the Northern Hemisphere, the camera must be pointed directly at the North Star to achieve circles. If it's pointed in any other direction, you'll get straight lines. I assume this is what happened to you since you did point the camera in a different direction.
Roger Buenzow
7/7/2019 08:46:38 am
Yes - In LIVECOMP I too can not get it to go past 1600 on the ISO. I have not found a reason way. It sort of makes sense, being that your are taking a series of shots and just adding new light in LIVECOMP mode vs BULB mode.
joylene lee-archer
8/23/2015 11:18:53 pm
Jim
8/24/2015 07:29:31 am
That's interesting. Just checked my EM1 and same thing; the iso is limited at 1600 in Live Comp. Never noticed that before. The article doesn't mention it and nothing in the manual either. I even did a Google search and iso isn't mentioned. I can only assume that the way Live Comp works, a higher iso isn't necessary. Learn something new every day!
janice
8/26/2015 05:16:24 pm
I took really appreciated your article on astrophotography, especially the star trails. I am another Southern Hemisphere resident - so can you please advise where to point the camera? I am using the EMD EM1 - do you think the 9-18 lens F4-5.6 wide open would be satisfactory? I also have a Nikon D7000 with 12-24 f2.8 what do you think of that or would the prime 50 f1.8 be better?
joylene lee-archer
8/26/2015 07:05:57 pm
Hi Janice.. i have the OMD EM1 and when i brought it i had to have the cameras software updated to do the star trails otherwise it wont work.. (that is what i was told) I was told by Jim that because i live in the Northern Hemisphere to point my camera to get circles i was told to point it at the north star to get circles.. point it at the other way you get the stars falling ..I love both effects.. Jim will be able to help you more..
Jim
8/27/2015 02:16:04 am
Janice: if you live in the Southern hemisphere, you'll need to point your camera in the direction of the Southern cross to get circles. As for lens choice, your 2.8 Nikon is best; the faster the better for gathering star light. But if you use the D7000 for circles, you'll need star stacking software for post processing. You could try your 9-18 but I don't think you'll be happy with the results. F4 probably won't cut it. I use the Samyang 12mm 1.4 on my EM1 and it is fantastic! Very sharp edge to edge. Small, lightweight and relatively inexpensive. If you can afford it, buy it! Best of luck.
David
1/1/2016 08:43:42 pm
Hi Jim,
Jim
1/1/2016 10:41:30 pm
David: I apologize; my 12mm is the 2.0. That was an error on my part. Sorry for any confusion.
Roger Buenzow
7/7/2019 08:51:24 am
Olympus has the M Zuiko 17mm f/1.8 Lumix Wide Angle lens. Not as wide as the Samyang 12, but a fast lens at f/1.8.
Jim
8/27/2015 02:23:44 am
P.S. the 50 1.8 would probably not be the best choice for star circles because of its narrow field of view. The wider the better and that holds true with astrophotography in general. 9/18/2015 05:09:11 am
Excellent - I've never tried the Live composite feature on my EM-1 yet, so this is on the to do list for my upcoming holiday. Thanks for sharing.
Peter Baumgarten
9/18/2015 07:29:19 am
Thanks for the compliment, Alan. I hope you have lots of success with the Live Comp feature. It is truly remarkable. Cheers!
Jim
9/18/2015 12:23:21 pm
Peter: I was in the Colorado mountains under an almost full moon recently. It was partly cloudy and the effect achieved in Live Comp on the movement of the clouds was nothing short of surreal. I did discover that keeping the number of exposures to a minimum (less than 20) was key to not overdoing the effect.
joylene Lee-Archer
11/1/2015 11:44:45 pm
Jim..I just got back from Colorado Springs.. did try once to do star trails but the weather was not all that great.. even when i went into New Mexico Moab Aspen and a few other places the weather was not all that great do came home with nothing .. never mind another time
Jim
11/11/2015 03:11:11 pm
Bummer! Hate when that happens. Keep me posted!
joylene lee-archer
11/1/2015 11:39:20 pm
The OMD 5 does not do star trails like the Olympus 10 and OMD-1.. I wished it did as that was the first one i brought.. that's why i brought the second one and had the soft ware updated
james
11/11/2015 01:45:41 pm
Would live comp work for meteor showers, or would star trails appear? Are there different strategies for both meteors and stars?
Jim
11/11/2015 03:09:48 pm
You will get star trails in Live Comp. No way to avoid it. The best way to capture meteors with any camera is to take multiple exposures in the continuous shooting mode or BULB mode. Use a wide lens to cover as much as the sky as possible. I use the Samyang 12mm on my EM1. Do a little research on each particular shower so you know where in the sky to look. And always bring an extra battery for these types of shoots! Good luck.
Peter Baumgarten
11/12/2015 03:05:39 pm
Hi James,
Iain
11/24/2015 02:36:48 pm
I was kind of hoping this facility could be enabled in the e-m5-I with a firmware upgrade but that seems unlikely. Can I use some of these techniques with Live Bulb on my older camera and do the stacking in LightRoom?
Jim
11/24/2015 06:24:05 pm
Yes, you can capture star trails the on any DSLR as long has you have a fast wide lens. For stacking, I use StarStax, a free and very easy to use download. There are a few very helpful tutorials on YouTube.
This is the best article by far that I've found on Live Composite, very well written Peter - and some superb shots. This inspired me to play around and I just finished this lighthouse shot over the Christmas break, taken on Kangaroo Island in South Australia. Much easier than the old stacking process!
Robin
1/2/2016 06:28:32 am
Hi David
David
1/2/2016 08:31:12 am
Hi Robin,
Peter
1/2/2016 12:07:03 pm
Hi David, Thanks for the read and the compliment. It is much appreciated. I took a look at your lighthouse photo and it is quite impressive. Nice work indeed. Cheers and Happy New Year! 1/12/2016 12:58:13 am
What an incredibly helpful blog post. Thanks so much for going to the effort of posting something like this, hugely appreciated. Beautiful images. 1/12/2016 08:42:03 pm
I accidentally removed my name, please continue sending me info re the above.
Ian Burke
2/13/2016 09:20:27 am
Great article, The Olympus SF-2 also has live composite.
Ian Burke
2/13/2016 09:21:38 am
Sorry I meant the Olympus SH-2 has live composite
Peter Willngham
3/2/2016 02:55:43 am
Hi
Peter Baumgarten
3/2/2016 08:40:49 am
Hi Peter,
Peter Willingham
3/2/2016 05:38:03 pm
Thanks for the reply Peter. Does the live composite reset if you change exposures? Shouldn't the second shot of the tree start the process? That's where I'm confused. The 2 shots have to be taken in composite mode so and if it's 2 shutter release presses that starts the process wouldn't taking that 2nd shot of the tree count as the 2nd shutter press that would start the process?
Peter
3/11/2016 07:49:42 pm
Tried it last night Peter. Thanks for the tutorial. It made sense once I did it and I also had to refer to this page while doing it. Disregard my top post I didn't understand properly. Photo didn't turn out as 3mins into the exposures clouds came and covered the sky.
Peter
3/14/2016 08:30:55 am
Glad that this post helped. Night sky photography can be incredibly rewarding, but equally frustrating when mother nature doesn't cooperate. Cheers!
TINGHAN CHEN
3/12/2016 05:19:06 am
hi i just bought mark2 m5 , but when i try to use livecomp the picture is soooo white(bright) i dont know why. can you help me ?
Peter
3/14/2016 08:34:32 am
Tinghan, I am guessing that your base exposure is set too long for the conditions under which you are shooting. Live Comp is only meant for shooting in dark conditions (star trails, nightscapes in the city, fireworks, etc.) Once you have entered the Live Comp mode check your base exposure by pressing the Menu button. Try shorter base exposures first to see what results you get. Hope that helps.
Carol
9/4/2016 01:12:34 am
I successfully use Live Comp in the daytime for cloud trails on windy days. Especially beautiful at sunset. The trick is to use a ND1000 filter to allow for exposures of 1/2 second (Live Comp limitation) or more in daylight.
David Harrison
5/2/2016 03:05:31 am
Thanks for the post but still can't get my head round it regards base exposure etc.
Carol
9/4/2016 01:30:52 am
David, The first exposure the camera takes is your base photo, the subsequent exposures will only add in new light. Think of what your settings would be if you made a single correct exposure of the scene (excluding the night sky). I usually take some test shots to see what the best exposure is before setting up Live Comp. Then you know what to make your settings in Live Comp. LC wants a shutter speed of 1/2 second or more, so make sure your test shots are that. Then go into the menu and turn on LC and set the seconds that will be for each exposure of the LC. I recommend a remote trigger also.
Carol
9/4/2016 02:08:55 am
After re-reading Peter's notes, I think I mis-spoke about the first exposure. He said the first shutter press is to take an exposure for noise reduction, then the camera prompts you to begin the Live Comp. Base exposure would be the settings you need to take a correct single exposure of the scene. (ex: ISO 1600, 10 sec., f/2.8) Then 10 seconds is used in each of the updates on the LCD monitor.
kerry beever
6/19/2016 07:25:12 am
fantastic article. May I ask if you have shot auroras this way?
Peter
6/20/2016 07:51:04 am
Hi Kerry,
Ian Burke
6/19/2016 12:34:08 pm
joylene lee-archer
6/27/2016 02:21:41 am
Hi Jim
Peter Baumgarten
6/29/2016 07:31:25 am
Hi Joy,
joylene lee-archer
6/29/2016 08:37:02 am
Thank you Peter.. Yes I worked that out tonight just before I got your response. at least I am on the same wave length as you.. will be going out on the week-end and give it another go.. what setting would you do light painting on. Live comp, live view or bulb. or on another like A, P, M
Peter Baumgarten
6/29/2016 09:01:36 am
I use Live Comp for light painting. LC can only be accessed in the M mode. If I am doing an extended Live Comp (an hour or so) I always do the light painting at the start. If I don't like it I can always begin again - less time wasted.
Hong
6/30/2016 06:14:00 am
Hi Peter
Mike Mercer
7/10/2016 08:49:09 pm
Hey, have you found a way to turn off the LCD while shooting? I know it is not ideal, but it can be pesky for others trying to shoot around you me....
Peter
7/11/2016 03:36:31 pm
Hi Mike,
joylene Lee-archer
7/13/2016 10:40:40 pm
can some one tell me when you use live come and its dark outside the back of the screen goes black, in the light the back it is nice and clear in the plus and when it is a very dark place it goes in the minus .. you think it would be the other way around thanks
Peter
7/14/2016 09:37:12 am
Hi Joylene,
MarkP
8/8/2016 06:00:56 pm
Very good site - but when I followed the guide could not get my OMD EM1 to fire the second shutter - just would not respond to shutter - either manually or via remote. Finally changed my lens (12-40 pro) to manual focus and it worked - has anyone else suffered this?
Peter Baumgarten
8/8/2016 08:41:17 pm
Hi Mark,
Mey
8/11/2016 04:10:27 pm
I have the Olympus Pen Lite E-Pl7 and doesn't have Live Composite feature. It only has BULB and Live Time
Rhiannon
8/23/2016 09:03:59 pm
I just bought the Olympus Pen Lite E-PL7 and cannot for the life of me find the live composite. I've turned it onto manual mode and used the dial to go down past 60 but it doesn't pop up with live composite, bulb or any of those other modes that it shows on YouTube/internet tutorials? Would love any help!
Peter
8/27/2016 08:04:39 am
Hi Rhiannon,
Rhiannon
8/27/2016 07:45:49 pm
Thanks so much Peter - I just changed it to LF+RAW and it's now working! Is it okay to leave it on that LF+RAW setting for normal shooting or should I just turn it on when I'm shooting live composite?
Peter
8/27/2016 08:44:47 pm
LF+RAW means you are recording two images - one jpeg and one RAW. I do that for almost all of my photos.
Rob parsons
8/26/2016 04:47:28 pm
What happens if live Copisition is left to shoot until the battery on the camera dies?
Rob parsons
8/26/2016 04:59:25 pm
Also how can you change battery mid composition? That would power off the camera thus stopping the photo right?
Peter Baumgarten
8/27/2016 07:37:32 am
Hi Rob,
Dens
8/29/2016 11:14:52 am
Peter,
Peter Baumgarten
8/29/2016 12:01:39 pm
I don't own the lens so I can't speak with any authority. On the positive side an f/1.7 aperture would be great, but a 40mm (ff equivalent) would really restrict your field of view. I love the Olympus 12mm f/2.0, but at times find the 24mm equivalent a little restrictive.
Dens
8/29/2016 12:21:41 pm
Thanks, Peter.
Peter
8/29/2016 12:28:39 pm
All m4/3 cameras have a sensor that is half the size of full frame. This means they have a 2x crop factor. As such a 25mm lens on m4/3 gives you the equivalent field of view of 50mm on a full frame camera.
charli
9/10/2016 10:33:50 pm
Peter, thank you for this very helpful and inspiring article.
Peter
9/11/2016 07:05:12 pm
Hi Charli,
charli
9/15/2016 07:15:30 pm
Thanks, Peter. Yes, that does sound counterintuitive, but I trust your expertise and will give it a try. :-)
Peter
9/15/2016 07:34:53 pm
I have both lenses and I use the 12mm (f/2.0 not 2.8). It is an excellent astro lens. A wider angle is usually the preferred choice for astro work.
Carol
9/15/2016 06:12:50 pm
Thama
12/12/2016 11:33:25 pm
Hi Peter, thanks a lot for the informative article!
Mr John Hinde
12/22/2016 07:02:46 pm
Great post. Tried it tonight, but need to refine technique a bit
Ian Miller
1/3/2017 01:04:59 pm
Thank you so much for this walk-through. I have spent years labouring with registax software and never achieved anything close to the star trail I achieved last night in 45 minutes. I am astonished and very very grateful to you for sharing your wisdom. Very kind regards.
Peter
1/7/2017 11:16:26 am
Glad I could help, Ian. Enjoy!
Andrew Marino
2/16/2017 10:49:29 pm
Hi,
Andrew Marino
2/17/2017 09:37:13 pm
I think I partially answered some of my questions. I noticed that in Live Composite that the NR is automatically set to ON and grayed out.
Archana
3/1/2017 11:32:32 am
This is very informative... I used these guideline to click fireworks.. And tried star trail couple of times... Sometimes the trail came out good... Sometimes it didn't focus properly... Wht could be the reason??
Peter
3/1/2017 11:40:08 am
Hi Archana,
Archana
3/1/2017 09:39:02 pm
That's what I am going to try this weekend... Thank you... Will let you know how it works for me.
Andrew
3/1/2017 07:31:17 pm
Hi Peter,
Richard
4/3/2017 04:32:46 am
Manual refocus after taking the foreground shot?
Richard
4/3/2017 04:31:41 am
That's a nice thing about Live Comp - the foreground doesn't get brighter. It's equivalent to taking lots of shots and then combining them in Photoshop or similar on a "brightest pixel wins" basis. So the foreground gets the same exposure each time.
Ah be
6/10/2017 01:58:34 pm
Thks its been a very helpful infor
Jessica C Giannone
6/12/2017 12:13:40 am
Does a 45 minute exposure require the use of the battery grip with a second battery? Going to attempt this but not sure how much time one battery can last for. Thanks!
Peter
6/12/2017 07:43:41 am
Hi Jessica,
Jessica C Giannone
6/12/2017 01:03:52 pm
Hi, I have a question about Step #2:
Malcolm Forbes
9/8/2017 12:28:12 am
For a varient on star trails; go to 'Heavens Above' web site & search for 'Iridium' satellites. These satellites have solar panels which reflect a surprising amount of light. The site gives altitude & azimuth for the flare. Compasses that read out that have alt & az are available from Suunto or Silva. OK, there is a bit of a learning curve here, but knowing exactly where you can plan to see a meteor like trail against the background of your choosing is pretty neat.
Roberto
4/7/2018 03:32:42 am
Good morning, congratulations for the articles because they are really very beautiful. 1/1/2019 08:55:20 pm
Can I just say what a relief to find someone who actually knows what they’re talking about on the internet? You definitely know how to bring an issue to light and make it important. More people need to read this and understand this side of the story. I can’t believe you’re not more popular because you definitely have the gift. 3/28/2019 12:52:56 pm
Hello! I just would like to give a huge thumbs up for the great info you have here on this post. I will be coming back to your blog for more soon.
Shannon
5/12/2019 08:20:57 pm
Great work. I am wondering if you have ever used the Live Composition for the Aurora or if it would work. I was going to try it but they have been scarce here lately so I haven't had a chance. Justt curious if anyone has tried it
Trevor Payne
7/24/2019 03:55:28 pm
Reading your blog on Live Composites and want to try but can't find the previous night photography blogs you refer to. How do I scroll through your various blog entries to find the sequence ?
Dan Whetstone
8/24/2020 01:07:44 am
Hi Peter,
Peter Baumgarten
8/24/2020 10:12:41 am
Hi Dan,
Dan Whetstone
8/24/2020 11:40:35 am
Thank you Peter. I’ll try that as soon as I can see the stars. I’m in California and we are socked in with wildfire smoke right now. 11/21/2020 08:28:52 am
Subscribing. Love your work and your ability to teach. Leave a Reply. |