|
Photography is often referred to as the art of “painting with light”. In most instances that 'painting' happens in a fraction of a second. The Live Composite feature on Olympus cameras allows that light to be painted on the sensor for much longer periods of time without overexposing the whole image. When I first started using Live Composite I had one purpose in mind - to capture star trails. It is certainly ideal for accomplishing that task since the feature is designed to work in low light conditions, but now it's time to go beyond the stars. If you are new to Live Composite or want information specific to creating star trails check out my article, Olympus, Live Composite and Star Trails. 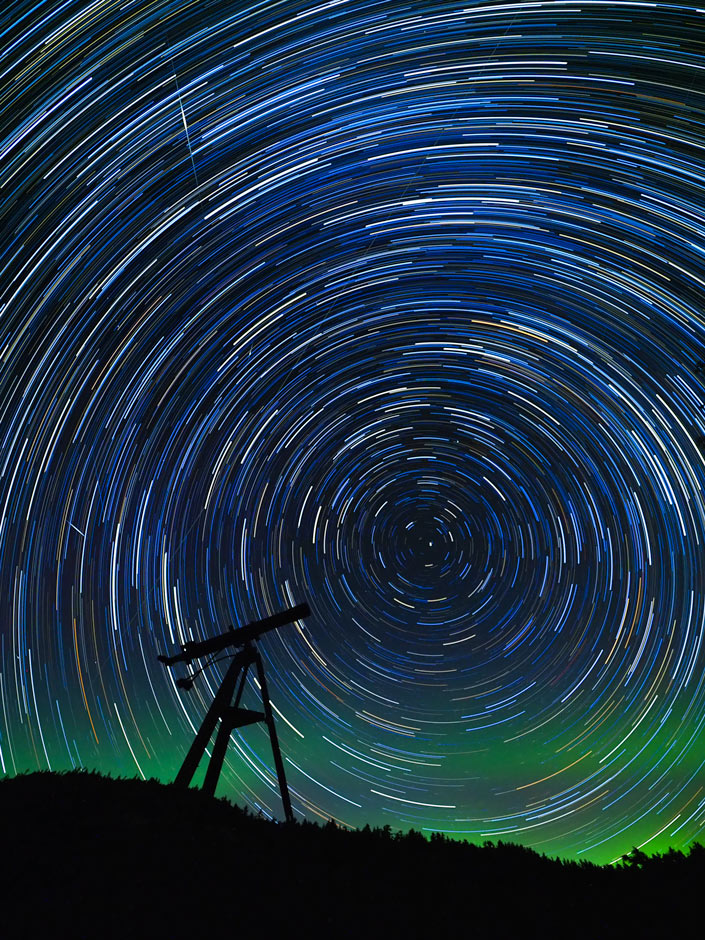 Live Composite dramatically simplifies the process of creating star trail images like this one, but can be used for a number of different purposes as well. The purpose of this post is to illustrate more earthly pursuits that involve live composite including capturing fireworks, lightning, traffic trails, moving clouds and light painting. Rather than go through a step-by-step process (if you need that check out that link above) I thought I would show some specific examples of photos that use live composite and how that image was achieved. Some of the photos below are my own, but I have also engaged the help of three fellow Olympus Trailblazers; Mike Boening, Frank Smith and Jamie MacDonald. Traffic Trails - Headlights and Tail Lights Photographer: Peter Baumgarten Location: Willisville, Ontario within the LaCloche Mountains 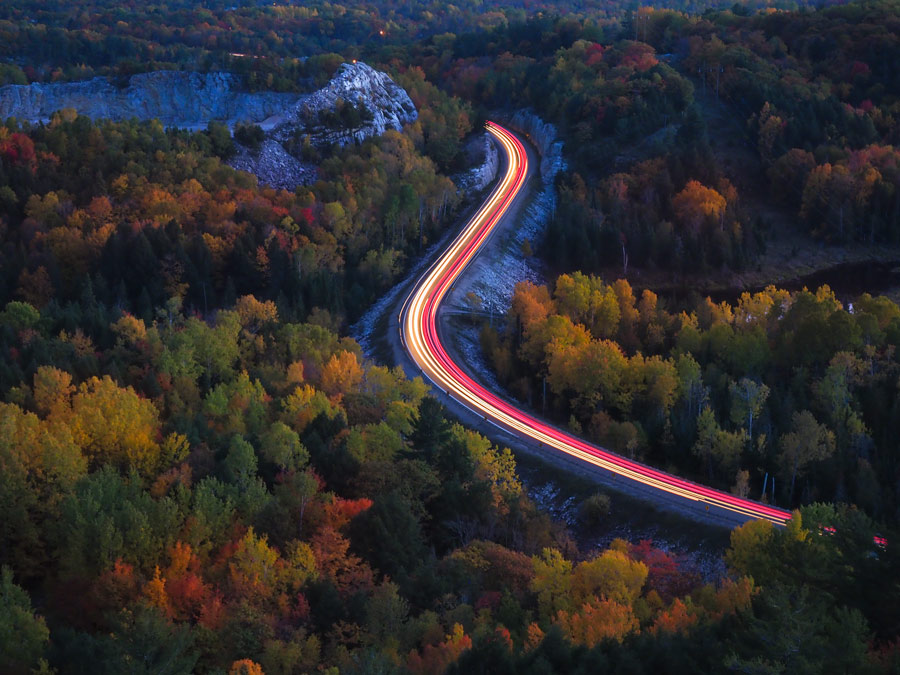 The Backstory: I have driven this section of highway countless times and thought that this S-curve had great potential for a live composite shot. With the autumn leaves ablaze it seemed like the perfect time to give it try. After a 30-minute hike I found a great vantage point from which to shoot so I set up my tripod and began the process. Keys to Success: Linear elements are always an eye-catcher in a photograph. Find a section of highway where the resulting traffic trails will draw in the viewer. Being somewhat elevated (perhaps not as elevated as I was in this shot) will help to avoid intense glare from oncoming headlights which can ruin your photo. Settings Camera: E-M1 Mark II Lens: M.12-40mm f/2.8 PRO ISO1600 Aperture f/3.5 Base Exposure 1/5s Total Exposure approximately 2 minutes Photographer: Frank T. Smith Location: Brooklyn, New York 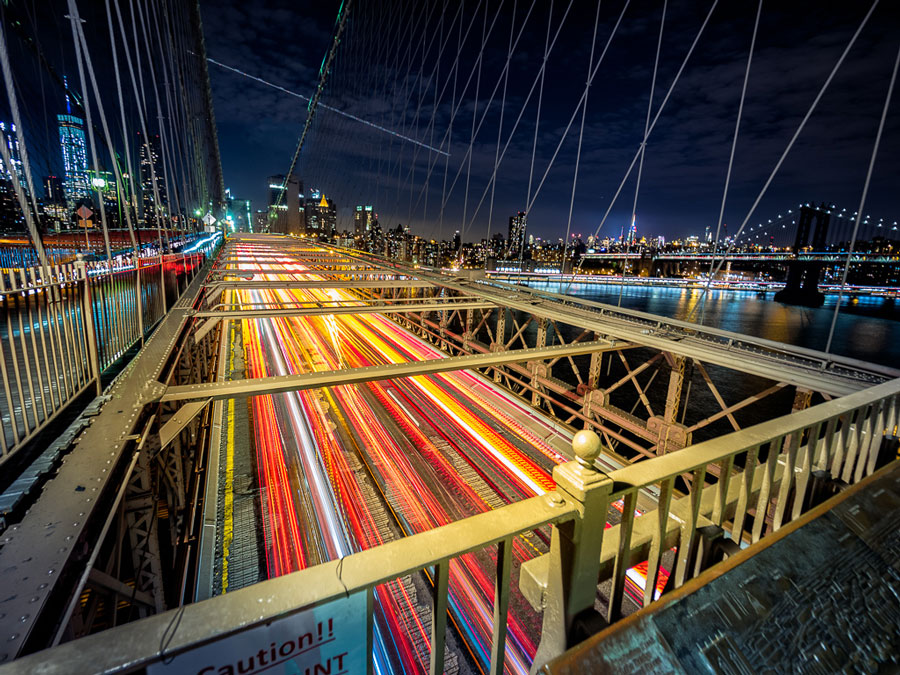 The Backstory: I have often wanted to photograph from the Brooklyn Bridge and fortunately this past summer I had an opportunity to photograph the skyline of Manhattan from Brooklyn. As we wrapped up the golden hour shoot I thought now would be the ideal time to head over to the Brooklyn Bridge. About midway across the bridge I found what I thought would be the perfect vantage point. Keys to Success: A successful composition strategy to any photograph is creating geometric leading lines of interest. With this particular image, I tried to find a location where traffic would lead your eye in to the city. The most challenging aspect to shooting from a bridge is finding a stabilized portion. To accomplish this I positioned myself at a primary bridge pier thereby minimizing vibrations. Settings: Camera: OM-D E-M5 Mark II Lens: M.7-14mm f/2.8 PRO ISO: 400 Aperture f2.8 Base Exposure 1.0 second Total Exposure approximately 60 seconds For more of Frank’s great images check out his website or his blog. Photographer: Mike Boening Location: In moving vehicle on streets of Rochester Hill, MI 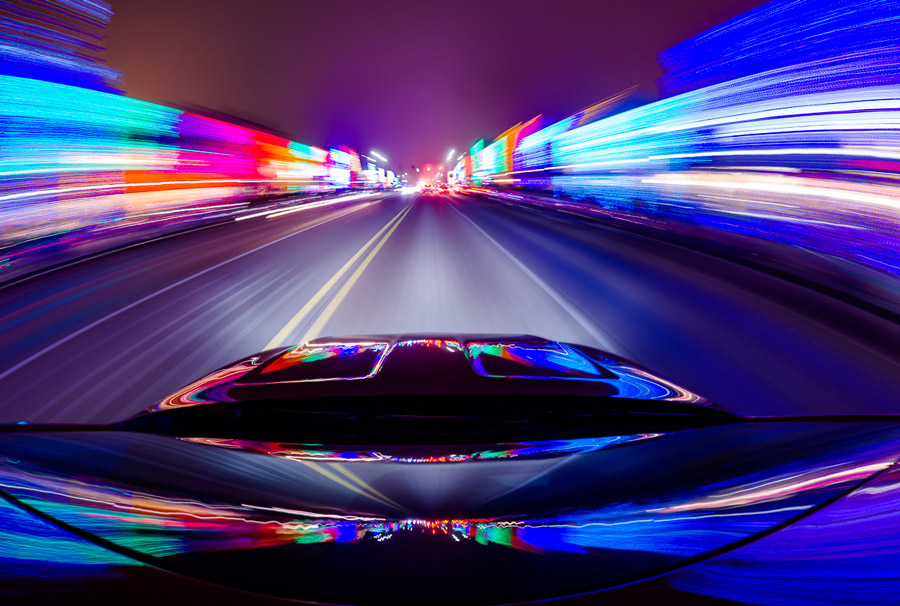 The Backstory: I wanted to create the “warp speed” effect you might see in a movie and I knew of a perfect location near my home. The city of Rochester Hills, MI always decorates every store front at Christmas time with rows and rows of lights. It’s an amazing site! With this wall of light on each side of me I knew the motion would blur them out if I could set up my camera in a moving vehicle. Keys to Success: For this type of shot doing it as late as possible is key so you don’t have to contend with the lights of oncoming cars and your driver can stay as straight as possible using the lines on the road as leading lines in your image. Further instructions on setting up of the camera and vehicle can be found in my blog post. Camera Settings Camera: E-M10 Mark II Lens: M. 8mm f/1.8 PRO Fisheye ISO: 200 Aperture: f/5.6 Base Exposure: 2.0 sec Total Exposure approximately 15 to 20 seconds For more of Mike's great images check out his website or Flickr page. Photographer: Peter Baumgarten Location: Minneapolis, MN. In the back seat! 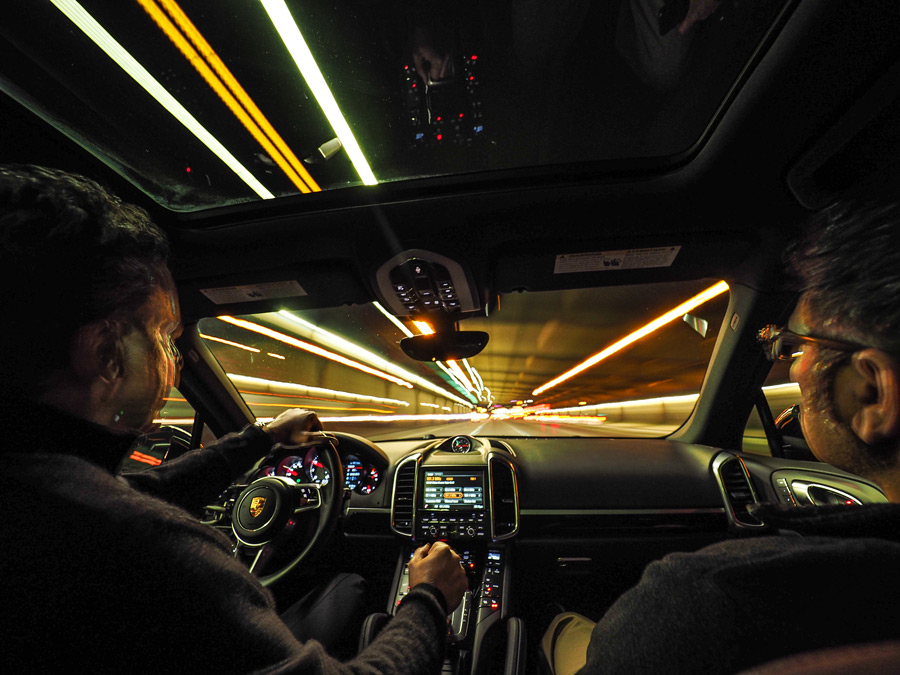 The Backstory: Similar to Mike's photo above, this is one of those images that I had seen done before and needed to try for my myself. While in Minneapolis for a photography presentation I was driving around in the back seat of one of the Olympus sales rep’s vehicles. It seemed like the perfect opportunity, so I set up my tripod on the floor of the vehicle and began the experiment. It took a few attempts but I eventually got one that worked. Keys to Success: This was definitely one of the more challenging live composite shots that I've attempted. Uneven pavement, lack of space to put a tripod, regular starting and stopping of the vehicle, all added a definite level of frustration to the experiment. Shooting for rather short exposures (10s or less) helped to improve my success rate. Settings Camera: E-M1 Lens: M.7-14mm f/2.8 PRO ISO400 Aperture f/3.5 Base Exposure 1/2s Total Exposure approximately 5s Lightning Strikes Photographer: Mike Boening Location: Near Boathouse Row in Philadelphia, PA  The Backstory: This image actually came about by being in the right place at the right time. We had planned to shoot a beautiful location at night called Boathouse Row but the weather was not being cooperative with our plans. It started to storm so we looked for possible cover. We turned and saw the lightning cracking in the distance over the city of Philadelphia. Knowing our cameras were weather sealed, and Live Composite is awesome at capturing lightning, we decided to stay and film the show and we were rewarded with the results. Keys to Success: If you know a storm is coming, first and foremost be safe and find a protected place to shoot from. When settled in, finding those iconic cityscapes or building in the background make for very ominous pictures with lightning appearing around them. Camera Settings Camera: E-M5 Mark II Lens: M. 12-40mm f/2.8 PRO ISO: 200 Aperture: f/11.0 Base Exposure: 2.5 sec Total Exposure approximately 2 to 3 minutes Photographer: Jamie MacDonald Location: West Olive, Michigan 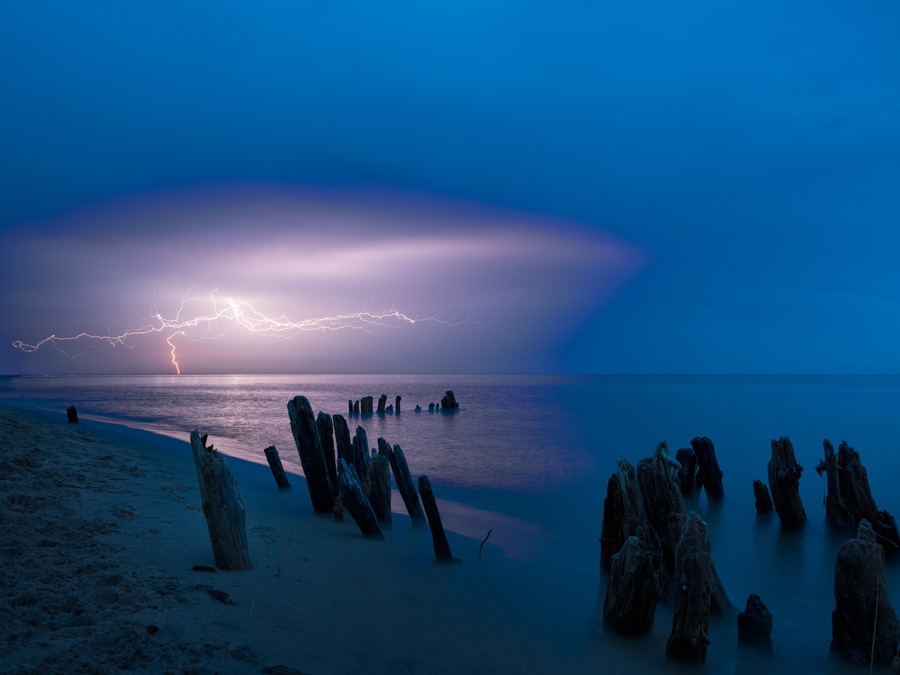 The Backstory: The evening this was shot I decided to head out to the shores of Lake Michigan to capture a sunset with these old pilings as a foreground. It became another instance of getting lucky with an electrical storm meeting me at the lake. Keys To Success: When photographing approaching electrical storms the use of a radar app such as Radarscope will help you determine where to be positioned to intercept the incoming weather as it can show you storm direction and lightning strike information. In this case I knew that the weather was approaching from the southwest and I could compose my shots to include the foreground elements as well as use the shoreline as a leading line to guide the viewer to the lightning strikes. Settings Camera: E-M5 MkII Lens: mZuiko 12-40mm PRO at 12mm Aperture f/4.5 ISO200 Live Comp Interval 1.6 seconds Exposure time approx 2 minutes Photographer: Jamie MacDonald Location: Grand Haven, Michigan 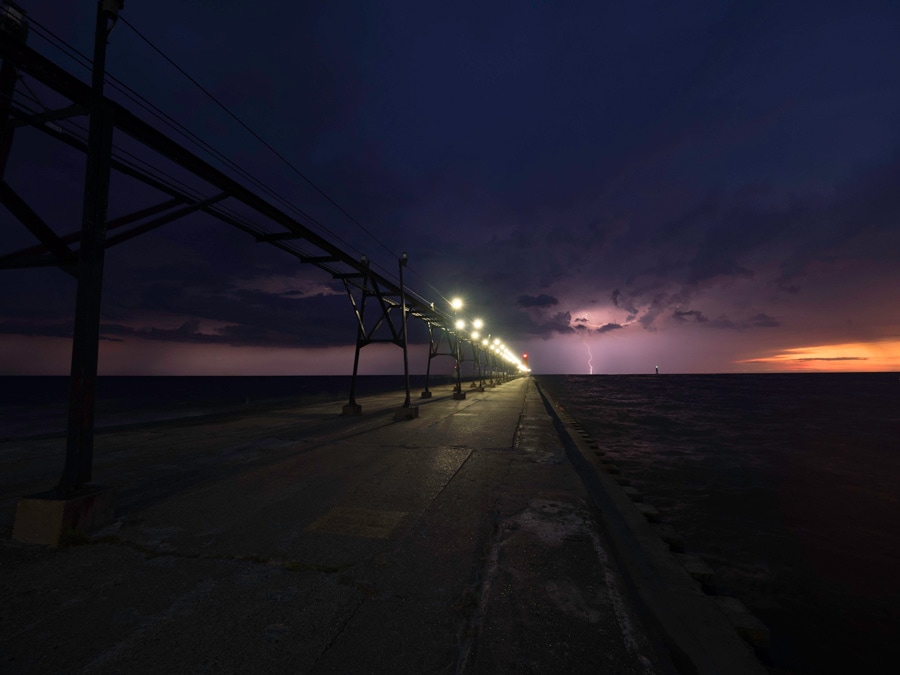 The Backstory: While on a trip to the Lake Michigan shoreline with friends to shoot the sunset, we were greeted with a storm out over the lake. I knew that if I exposed properly I could capture the glow of the sunset, and hopefully some lightning. After running this exposure for about 4 minutes I was lucky enough to capture this single bolt of lightning directly ahead of me. Keys To Success: Using strong leading lines to guide your eye to a focal point is always a sure bet for any composition. Luck favored me by providing not only a great sunset, but also a bolt of lightning, all in the direction my leading line was headed. Settings: Camera: E-M1 MkI Lens: mZuiko 7-14mm PRO at 7mm Aperturef/4.5 ISO200 Live Comp Interval 3.2 seconds. Exposure time approx. 4 minutes Moving Clouds Photographer: Frank T. Smith Location: Center Valley, PA 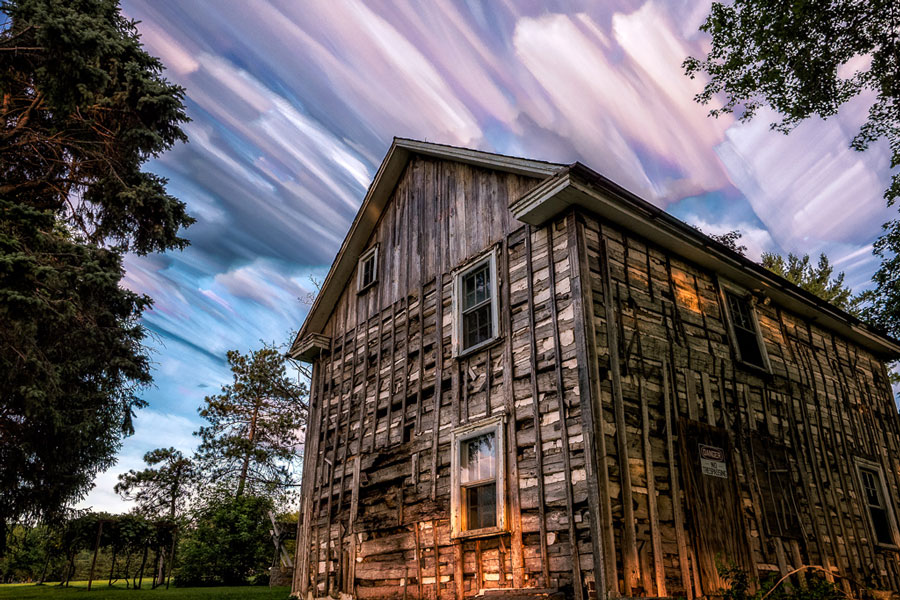 The Backstory: I have literally driven by this building more than 2000 times. The reason being it is located 2 blocks from my house. I’ve always wanted to photograph this and after I started experimenting with Live Composite for a period of time, I thought I would try to do a daytime Live Composite attempt. Keys to Success: The first thing I wanted to map out was a good composition. Specifically I wanted trees in both the foreground and background. However this is complicated if there is any movement to the anchor portions of the image - i.e. moving leaves or trees. Therefore a day with little to no wind was required. In order to accomplish a daytime Live Composite shot, a neutral density filter is required. In this particular case I used a 10 stop ND filter. Settings: Camera: OM-D E-M5 Mark II Lens: M.12-40mm f/2.8 PRO ISO: 400 Aperture f5.0 Base Exposure 4.0 second Total Exposure approximately 4 min. For more of Frank’s great images check out his website or his blog. Photographer: Peter Baumgarten Location: Manitoulin Island, Ontario 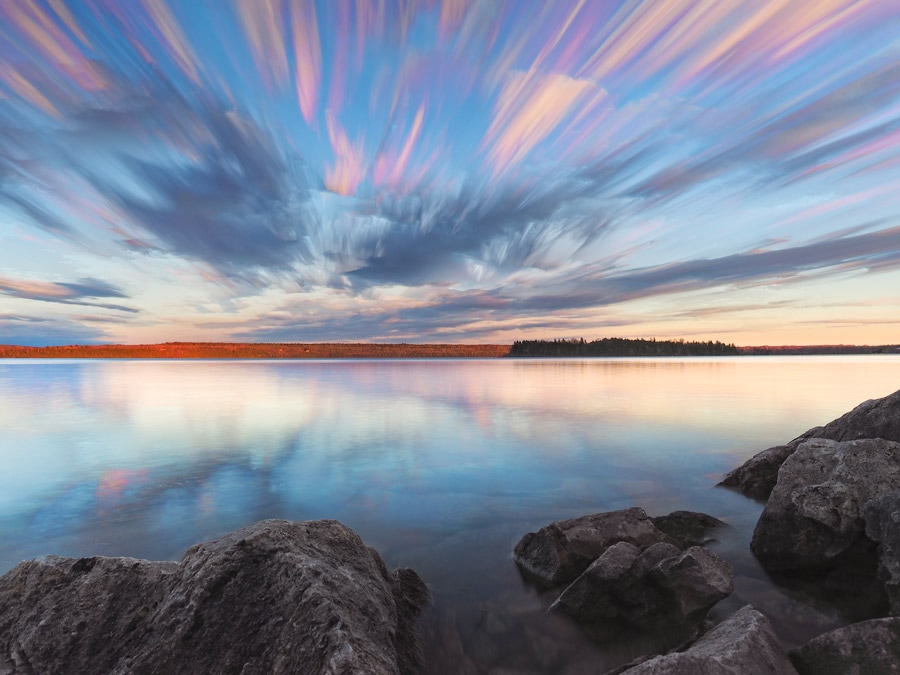 The Backstory: This spot is a stone's throw from my house and is often where I will head to shoot a sunrise. Given its easterly vantage point I rarely find myself in this location at sunset. This day happened to be the exception. The water was fairly calm, but the clouds in the upper atmosphere were definitely moving and were beginning to glow with the colour or early evening. This provided the perfect conditions to try a Live Composite shot. Keys to Success: Live Composite will only allow for a minimum base exposure of 1/2 second. This means that shooting with Live Comp is near impossible during daylight hours. To combat that, I attached my variable neutral density filter so that I could get to the 1/2s minimum. This allowed me to cut the amount of light but not affect the colours of the clouds. Settings Camera: E-M1 Lens: M.12-40mm f/2.8 PRO ISO200 Aperture f/10 Base Exposure 1/2s Total Exposure approximately 5 minutes Fireworks Photographer: Jamie MacDonald Location: Lansing, Michigan 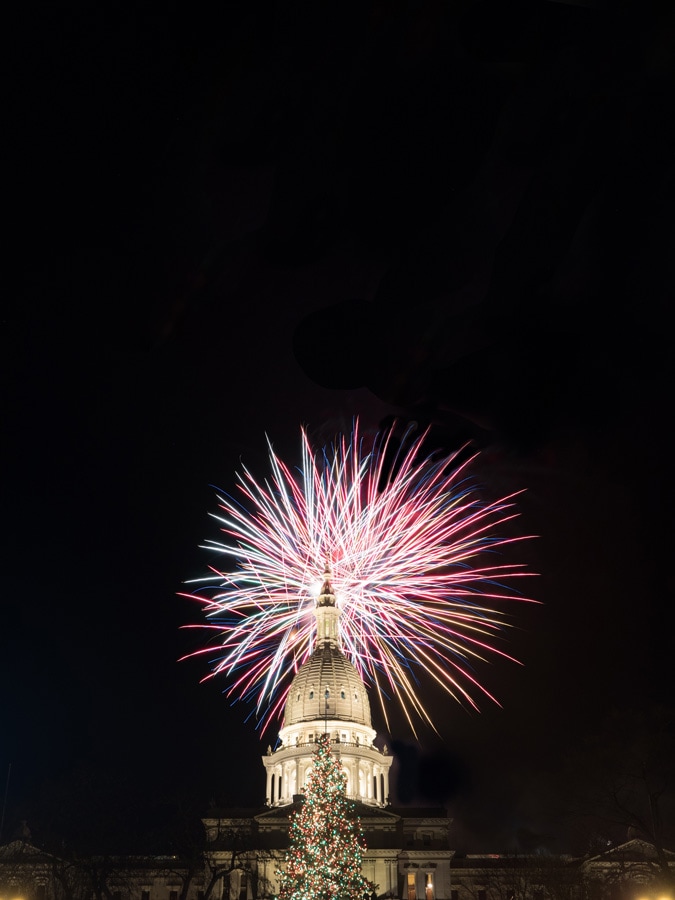 The Backstory: The Capitol of Michigan is the foreground for a fireworks display every December as part of their holiday celebrations. I met up with several local photographers to shoot this event knowing that it would be packed with people. Keys To Success: A trick to avoid getting the trail of the ascending fireworks in your shot is to start the Live Comp, then get your base exposure going, then when you hear the THUMP of the firework being launched, cover the lens with a hat or some other object to avoid exposing the trail. Remove the hat or object when the firework seems to be reaching its peak. With a little practice you can get multiple explosions in one exposure with no trails. This of course will be dependent upon your distance from the fireworks as sound travels slower than light. Settings: Camera: E-M5 MkII Lens: mZuiko 40-150mm PRO at 40mm Aperture: f/6.3 ISO200 Live Comp Interval 1 second Exposure time approx 7 seconds Photographer: Mike Boening Location: Saginaw Bay, Michigan 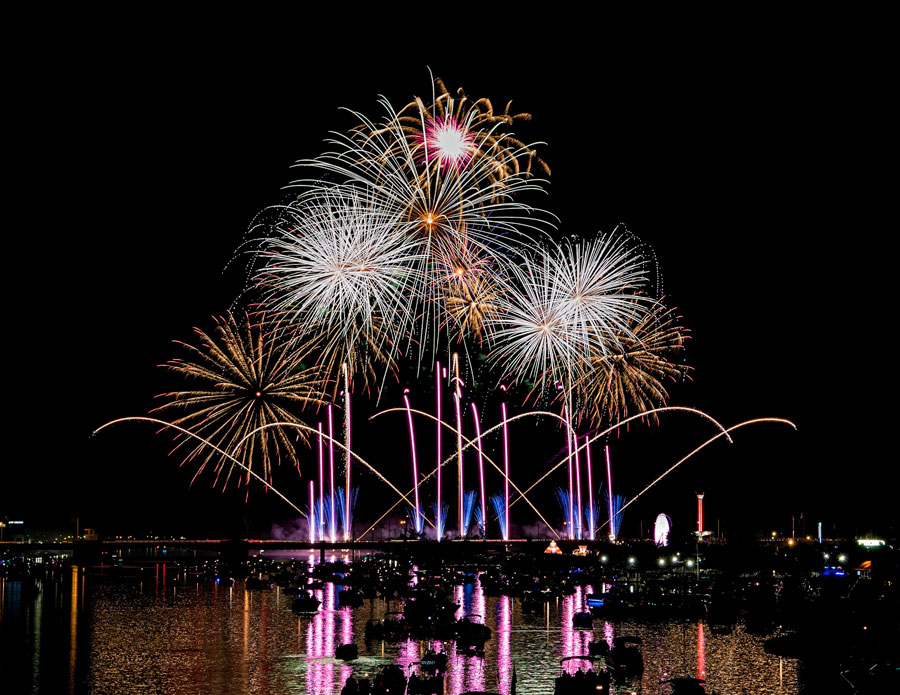 The Backstory: The Saginaw Bay fireworks, about 1 and a half hour drive north from the Metro Detroit area, is a unique location to shoot. The key factor into making this fireworks display so amazing is its shooting location, which is elevated on a bridge, and the fact that the water adds an interesting dimension to the shot. Keys to Success: Knowing my distance from the fireworks ahead of time helped with lens selection since I also wanted to capture the boats on the water watching the show. I wanted to be sure I captured the whole scene and use the water as a reflector as the night sky lit up in all its glory. As always, a clear night with not much wind, can really enhance your fireworks shot and minimizing the smoke that remains after the blasts. Settings OMD E-M5 Mark II m.12-42mm EZ Aperture f/7.1 ISO 200 Base Exposure 0.8s Total Exposure approximately 10s Photographer: Frank T. Smith Location: Bethlehem, PA 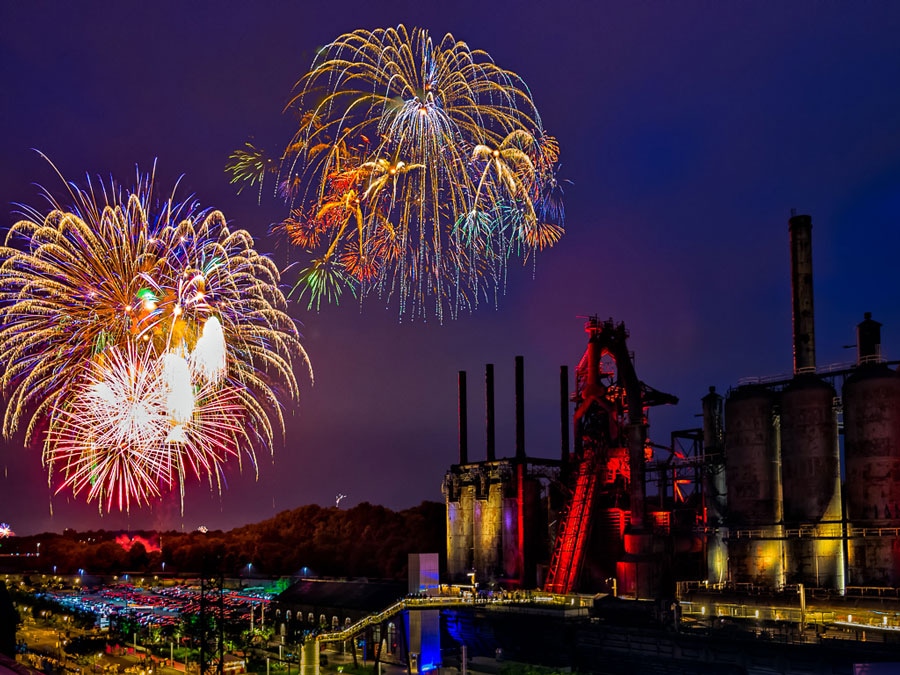 The Backstory: One of the largest firework displays in our area is performed at an arts venue called Steel Stacks in Bethlehem PA. I was granted access to the roof of the building, allowing me to capture this particular vantage point. The iconic site background is the old Bethlehem Steel blast furnaces. Keys to Success: The success of an image like this sometimes requires unique access. Once on the rooftop, as I studied the scene I knew I wanted to have the steel stacks play a prominent role in the overall composition. A clear night is a definite advantage and capturing images early in the fireworks sequence helps to minimize excess smoke from the fireworks. Settings Camera: OM-D E-M1 Lens: m.Zuiko 7-14mm f/2.8 PRO ISO 400 Aperture f/5.6 Base Exposure 1.0 second Total Exposure approximately 40 seconds. For more of Frank’s great images check out his website or his blog. Spinning Steel Wool Photographer: Jamie MacDonald Location: Jackson, Michigan 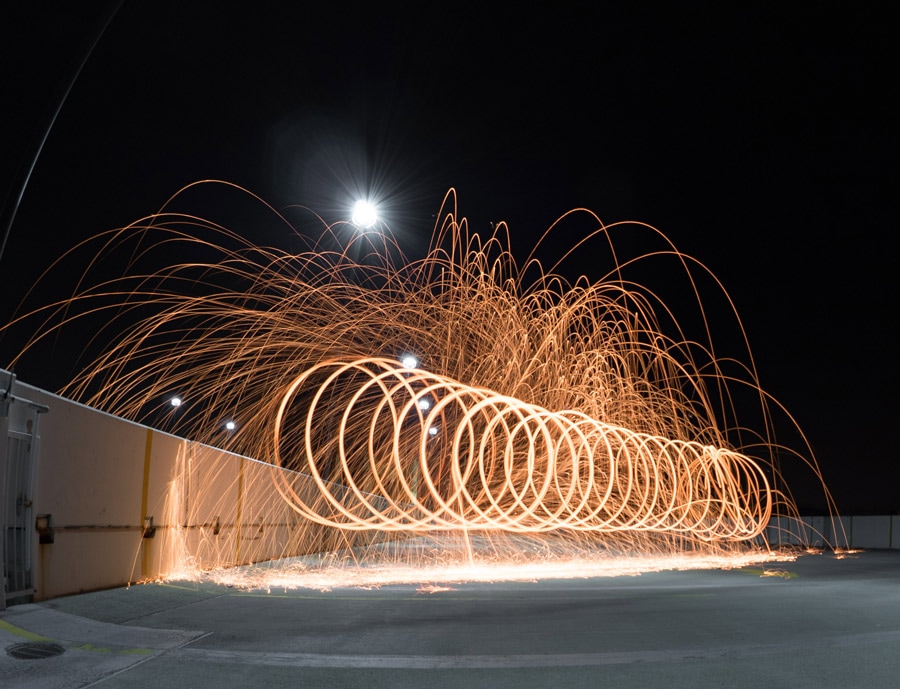 The Backstory: A couple of friends and I met up one night to go out shooting the city from the roof of a parking structure. While up there we decided to spin steel wool and do some long exposure and Live Composite shots. Keys To Success: Safety is the NUMBER ONE key to success for a steel wool spin!! We knew we'd be safe on the parking structure for several reasons. First being that it is made entirely of cement, the second that my friend always has a fire extinguisher with him when spinning steel wool. Steel wool burns very bright so you should always shoot with a low aperture, and an f-stop between f/5.6 and f/8 to help avoid blowing out the image. Settings: Camera: E-M5 MkII Lens: mZuiko 8mm Fisheye PRO Aperture f/5.6 ISO200 Live Comp Interval 2 seconds Exposure time approx 6 seconds Photographer: Peter Baumgarten Location: Manitoulin Island, Ontario 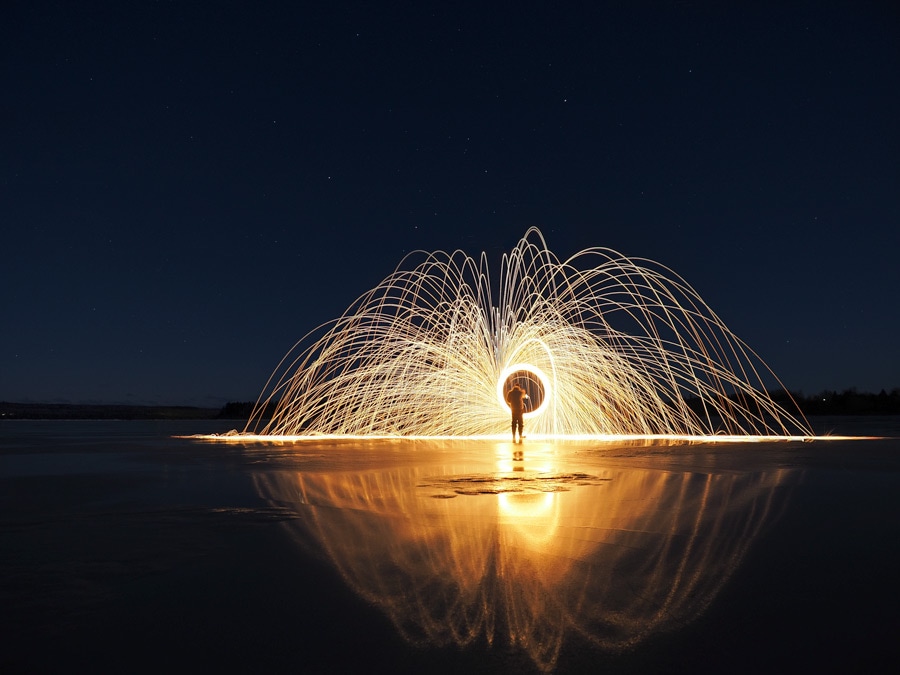 The Backstory: I'm always on the lookout for reflective surfaces that I can include in my photos. The ice on this lake seemed like the perfect candidate for a bit of steel wool spinning. Keys to Success: Like Jamie said, "safety first"! I recall the first time I did this I neglected to wear a hat. Small chunks of molten metal came raining down on my head. Not pretty! For this shot I needed to keep the total exposure down to a minimum so that I wouldn't get any movement in the stars. Settings Camera: E-M5 Mark II Lens: M.12-40mm f/2.8 PRO ISO200 Aperture f/2.8 Base Exposure 5s Total Exposure approximately 25 seconds Light Painting Photographer: Peter Baumgarten Location: Bethlehem, PA 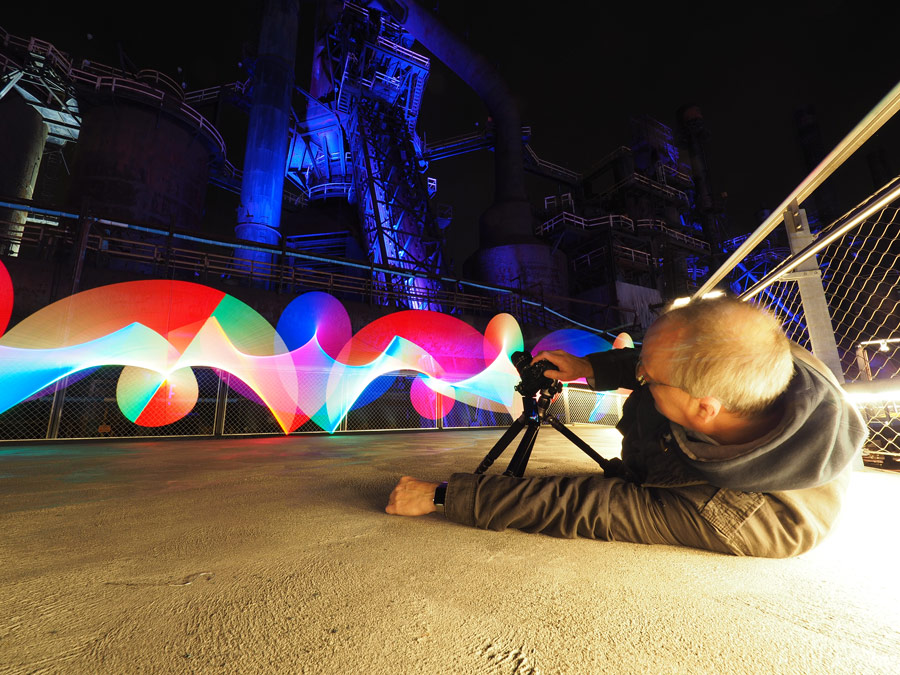 The Backstory: Each year the Visionaries and Trailblazers get together for the annual Visionary Summit. Of course, when you get a bunch of photographers together there is always ample opportunity to get out and do some shooting. In this shot, I captured Mike Boening in front of the Steel Stacks while I-don't-remember-who was spinning a pixelstick in the background. Keys to Success: I enjoy including people in my night shots, but the challenge is to ensure that they remain perfectly motionless during the exposure. I think Mike did a great job! As well, I usually shoot wide open at night, but considering Mike's close proximity to the lens I opted for a slightly smaller aperture setting. Settings: Camera: E-M5 Mark II Lens: M.7-14mm f/2.8 PRO ISO 200 Aperture f/7.1 Base Exposure: 4s Total Exposure approximately 20 seconds Photographer: Frank T. Smith Location: Quakertown, PA 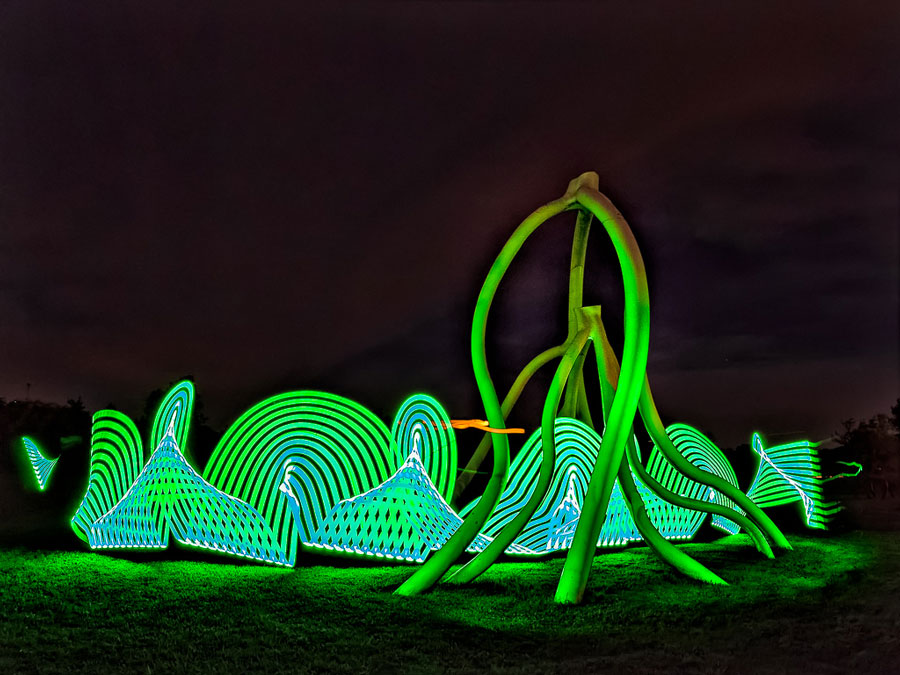 The Backstory: I conduct a workshop for an Olympus sponsored event where I teach the basics of light painting. Here we had an opportunity to photograph on the property of an internationally renowned sculpture artist by the name of Steve Tobin. Using the metal sculptures on site adds a creative advantage for light painting. Keys to Success: When working with light painting, creating a backdrop from an additional object, in this case the sculpture, helps to enhance the image when introducing light tools. We used a variety of different light sources during the shoot, however for this particular image we used a device called Pixelstick. Settings Camera: OM-D E-M1 Lens: m.Zuiko ED 8 mm f/1.8 Fisheye PRO ISO 800 Aperture f/5.6 Base Exposure 1.0 second Total Exposure approximately 60 seconds For more of Frank’s great images check out his website or his blog. Final Words Even though Live Composite has been around for a few years in Olympus cameras, it is a feature that I never tire of, and one that helps drive my creative spirit. Hopefully the images and stories in this post inspire you to try some of your own Live Composite shots. Thanks again to my friends and fellow Trailblazers, Mike Boening, Frank Smith and Jamie MacDonald for generously providing some fantastic images and the stories behind them. I encourage you to explore more of their work...  Mike Boening A Detroit based street/urban photographer and Olympus Trailblazer with a passion to “Shoot Light and Shoot Often”, Mike organizes and leads groups on street photography workshops as well as equipment operation. Mike co-hosts Mirrorless Minutes, a bi-weekly video podcast on YouTube. Visit Mike Boening at his website or Flickr page.  Jamie MacDonald Jamie MacDonald is a member of the Olympus Visionary Program who lives in Michigan's lower peninsula. Jamie, a nature and wildlife photographer is also the founder of the popular photography podcast Mirrorless Minutes and a workshop leader and photography educator. Visit Jamie at his website.  Frank T. Smith Frank Smith is an award winning photographer whose love for the craft goes back to a very early age. A native North-easterner, Frank often focuses his lens on national and regional scenery in the U.S. Frank’s work has been featured in the media, print, exhibits, and in philanthropic awareness campaigns. Frank inspires others through his workshops, classes and mentoring. Visit Frank at his website or his blog
4 Comments
Glenn
3/5/2017 07:20:48 pm
if you live near an airport it's great for airplane trails as well
Remco
8/16/2017 10:07:29 pm
Just wanted to thank you for your generosity of spirit and effort in creating this awesome informative blogsite. Thank you guys, you've inspired me big time. 2/19/2022 08:49:21 am
ks for sharing the article, and more importantly, your personal experience mindfully using our emotions as data about our inner state and knowing when it’s better to de-escalate by taking a time out are great tools. Apprecsxcsaciate you reading and sharing your story since I can certainly relate and I think others can to Leave a Reply. |