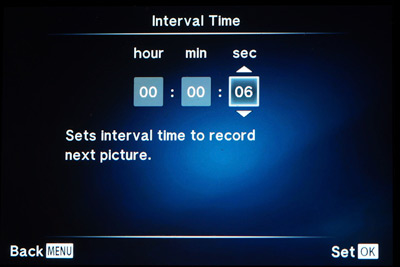
experimenting with time-lapse photographyAs a photographer I've always been fascinated with how the camera can help to expand our vision and freeze a moment in time. But today's cameras can do far more than that. They can capture a long sequence of 'moments' that would be difficult for the human eye to really notice. Time lapse photography has a long cinematic history. As a child I was always enthralled by the time lapse sequences that I would see produced by Walt Disney (Sunday evenings at 6 - anyone else remember those?!). Now, with your camera, some patience and a computer, anyone can capture a sequence taken over minutes, hours, days or weeks and speed up time. 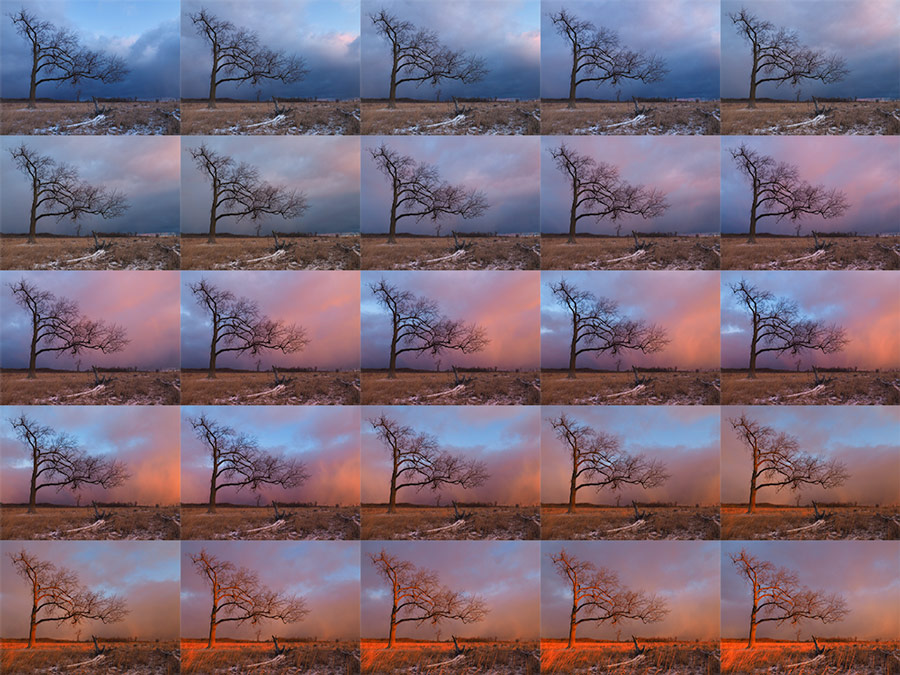 Twenty-five photos from a sequence of 192 images taken over the course of 26 minutes. One of the easiest time-lapse sequences to capture is the movement of clouds. They move slowly enough that the casual observer doesn't really notice them moving at all, but fast enough that a 20 - 30 minute sequence can lead to impressive results. The composite above illustrates that well. For the Waves of Colour time lapse I set the camera to shoot at 6-second intervals and processed the series to play back at 16 frames per second. Let's look at how the process works. stepsShooting the Time-Lapse Sequence Let's start with a qualifier. Although several camera manufacturers have built-in time lapse capabilities or have the capacity to attach an intervalometer, my steps and menu shots are specific to Olympus-brand cameras. Let's also assume that you have your subject all picked out and you are ready to start the time-lapse sequence.
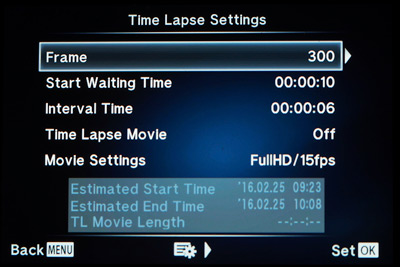
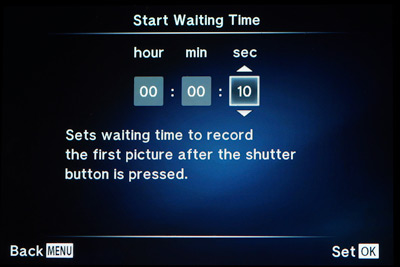
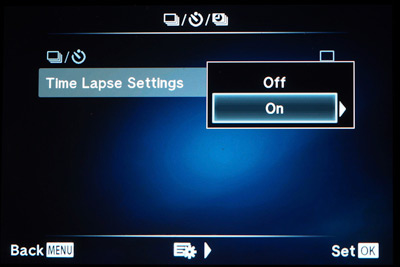
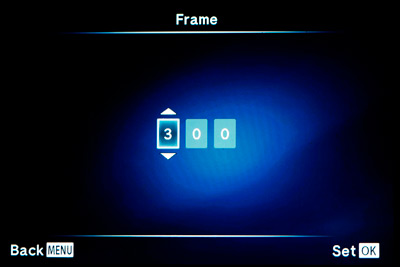
The screen shots below are taken from the Olympus OMD E-M1, Firmware Version 4.0 and illustrate each setting within the time lapse menu.
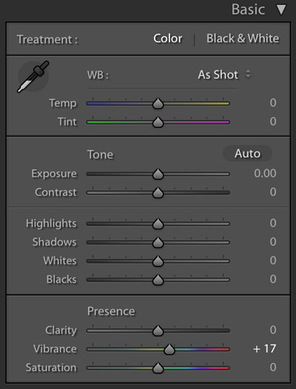
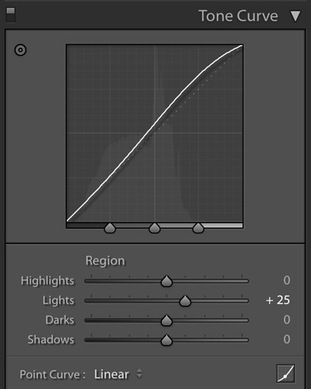
Image Processing If you choose to create the time-lapse movie in camera then this next section might be moot. For myself however, I rarely have the camera create the actual time lapse movie since I usually like to do a bit of post-processing work in Adobe Lightroom. Unless I am looking for a particular effect, I typically make minor adjustments that might include the following;
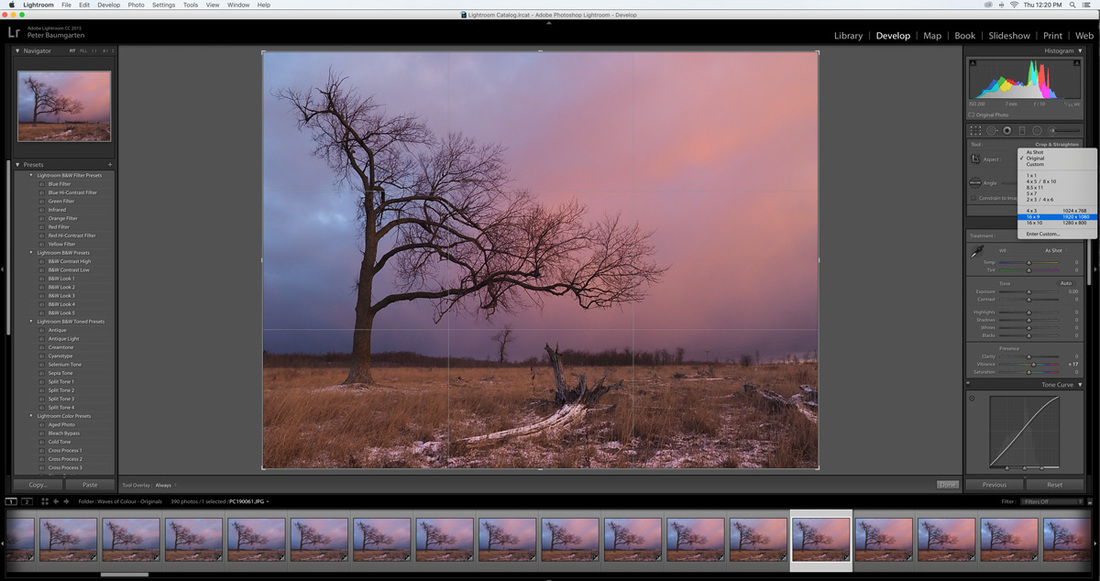 Although I didn't crop this image for the final time lapse, this screen shot illustrates the process. Click on the image to see a larger version. Once you have adjusted one image, select them all (Ctrl-A for Windows, or Cmd-A for Mac) and apply those adjustments to all of your images by selecting Sync. Lightroom is non-destructive which means that it records the adjustments you've made to your images, but doesn't permanently change the photos. As such, to use the photos with the changes you've made, you will have to export them. With all of your photos still selected, right-click on one of them and select 'Export'. Typically I only make two changes within the Export dialogue box - Export Location and File Naming. 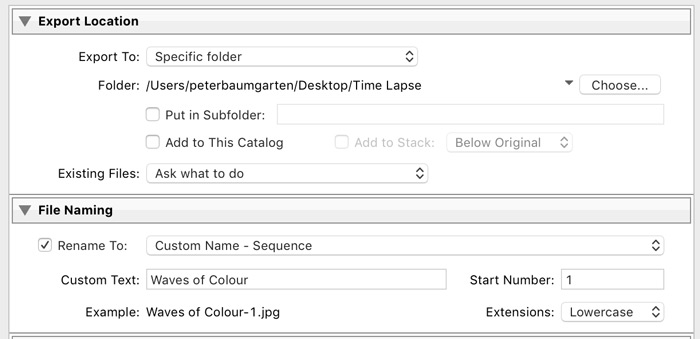 Creating the Time Lapse Movie Several software packages exist that allow the user to compile all of the time lapse images into a single movie file. I use Olympus Viewer 3. It's very easy to use and I've been happy with the results.
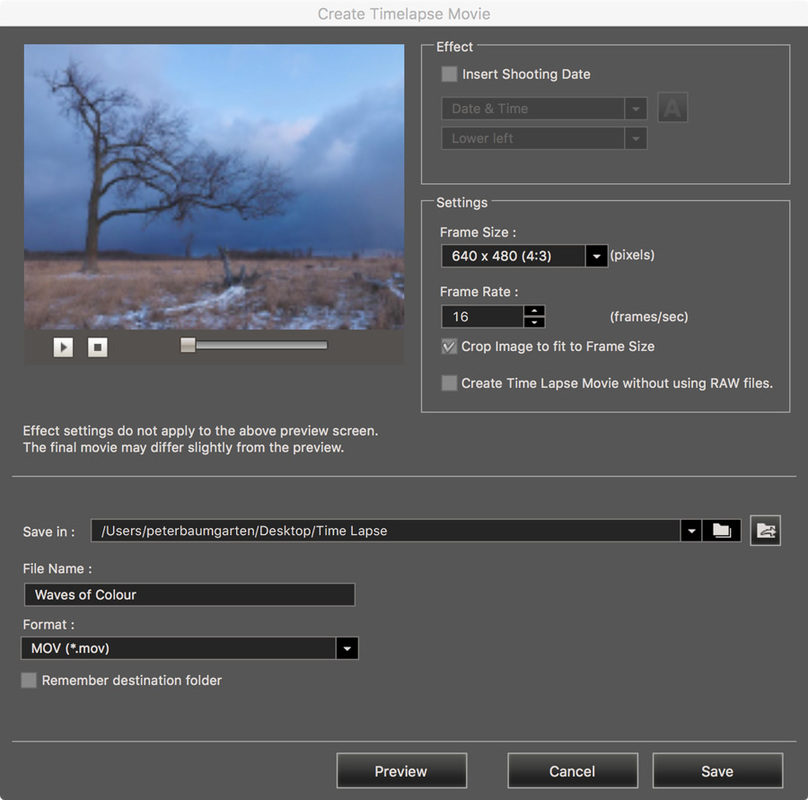 The Time Lapse Movie dialogue box within Olympus Viewer 3 Traditionally, movies were played at a rate of 24 frames per second. This presents a natural, smooth flow to the scene. On occasion I will use that rate, but for most of my time lapse sequences I choose a rate of between 16-20 fps. As mentioned, several time lapse movie packages are available online. Most allow various special effects to be added to your movies. A quick search will yield lots of results. Using a Movie Editor To create a more polished look to my time lapse movies I will often use a movie editor as my final step. I use iMovie. It's simple to use and powerful enough for the type of editing that I do. Once the time lapse sequences are built in Olympus Viewer 3, I import them into iMovie where I can add titles, transitions, tweak final exposure, add sound and other effects. SamplesNow that we have the 'how-to' section done, let's look at some other examples and their settings. Clouds over Killarney This sequence was shot in Killarney Provincial Park in northern Ontario. A rainstorm had just passed and the clouds held some promise for a nice sunset.
Sunrise Sure, the sun comes up every morning. And that makes it the perfect subject to try and capture in a time lapse. The sun rises quite quickly so make sure to set a fairly short interval between shots. In the video below I used a 3-second interval.
Swing Bridge This hundred-year old swing bridge is the only permanent connection between Manitoulin Island and the mainland. During the summer it swings once per hour to let sailboat traffic through.
Once you become comfortable with shooting time lapse sequences over short periods of time (less than 30 minutes), it's time to capture movement over much longer stretches of time. Each situation will come with it's own challenges. Let's look at a few. Galaxy Rising It's not just the sun and clouds that move above us. The stars move remarkably quickly through the night sky. The sequence below was photographed over 4.5 hours using two cameras. I took a number of test shots prior to starting the time lapse in order to ensure good exposure and composition. Many astrophotographers will recommend turning off your camera's noise reduction in order to prevent gaps in between shots. For this time lapse I left the NR on and you will see that it plays back quite smoothly. For more information on the basics of astrophotography check out my previous post, http://www.creativeislandphoto.com/blog/astrophotography-101
Blooming My earliest memories of time lapse photography were those Walt Disney nature sequences of plants growing and flowers blooming. I find these to be the most challenging, but also the most rewarding sequences to try and capture. The movie below was shot over a two-week period. A duration of this length definitely comes with a number of challenges.
Sprouts After the amaryllis time lapse, I decided to plant some sunflower seeds and see if I could capture their germination and the first few days of growth. The only new challenge for this sequence was timing their eruption from the soil. I knew it would be several days before the seeds germinated so I waited until I saw the soil bulging slightly and then I started the time lapse.
Fly Poop - A Time Lapse Fail Time lapse photography is not without its frustrations. Even the best laid plans can be ruined by mother nature. What Next? If it moves, you can create a time lapse sequence of it. There are many ideas floating around in my head that I would like to try (and hopefully will, eventually). Here are a few...
And Finally... Here are three more thoughts on time lapse photography. Shoot video instead. If you are only capturing a relatively short event (less than an hour), you might want to shoot video and use your editing software to speed it up. There are advantages and disadvantages to this; Advantages: You get very smooth playback since you are capturing every moment of the event. As well, it is easy to adjust playback speed to condense a 30-minute video, down to 30 seconds. Disadvantages: Video can be a memory hog, and you won't be capturing individual shots that you might want to use on their own. For the "Sunset on Lake Manitou" video, I set the camera up on the ice and captured the final moments of the sun setting, 28 minutes in total. I then used iMovie to speed the process up 4000%. This reduced the video to a length of 26 seconds. 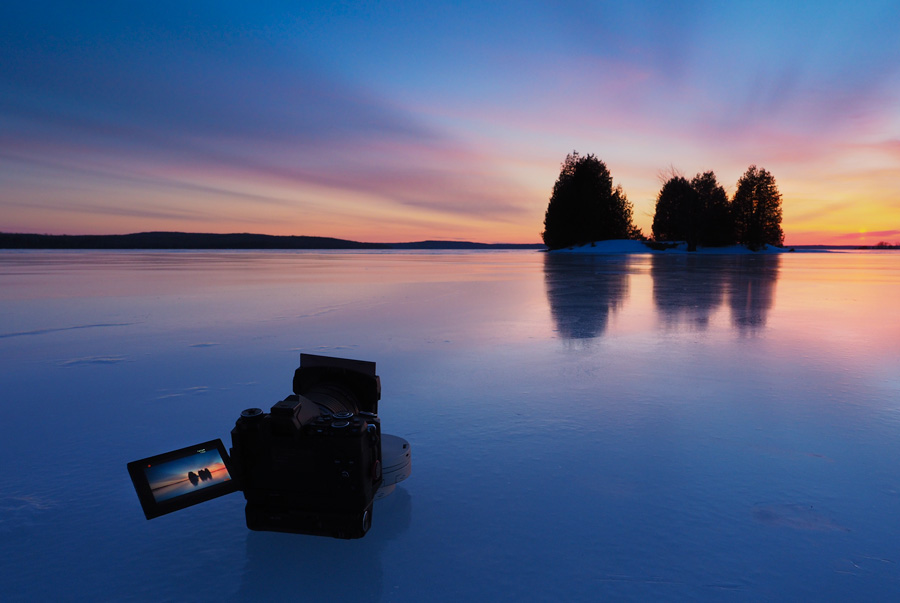 With my Olympus E-M5 Mark II shooting the video, I was able to continue composing other shots with a second camera. Use the time lapse feature to be in two places at the same time. When I am out photographing landscapes I will often shoot with two or three cameras. The first I will set up in one location, engage the time lapse settings and leave it there. Then I'm off to another spot to do some regular shooting. Once finished, I can decide whether to use the entire sequence of shots to build a time lapse or just one or two individual shots from the series. Most of the time, I am shooting in locations where I am not worried about someone finding the camera that I've left behind and taking it. However, on one occasion I returned to my camera and ran headlong into a bear! But, that's another story. 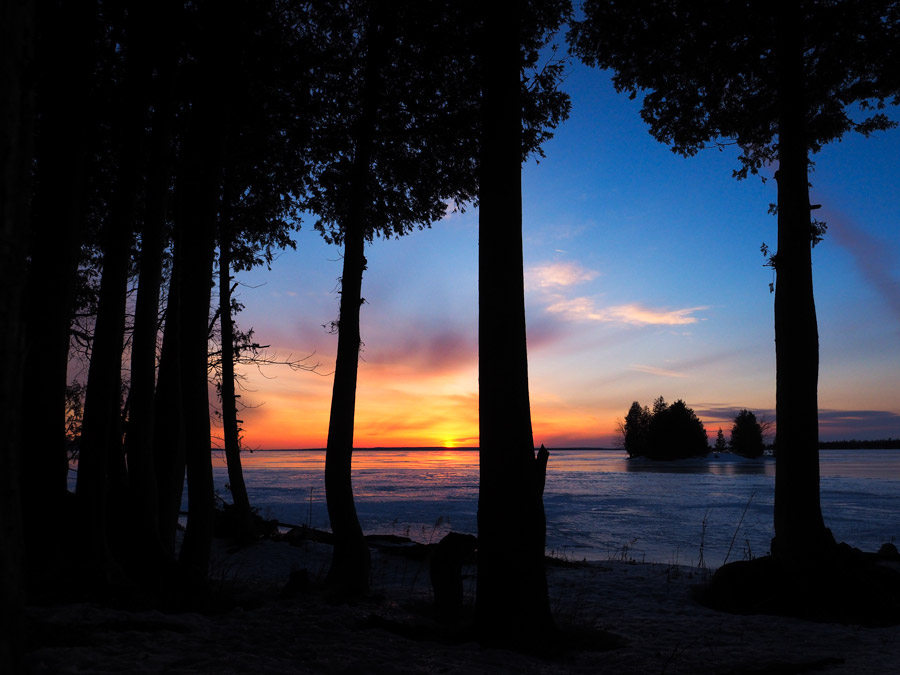 While one camera was shooting the sunset video above, I had another camera shooting the same sunset from within this clump of trees. Time Lapse Selfies Sometimes when I'm out shooting, I think, "wouldn't it be great if there was a person in this photo?" Then I realize that I'm the only person around. That's when I decide to take some time lapse selfies. 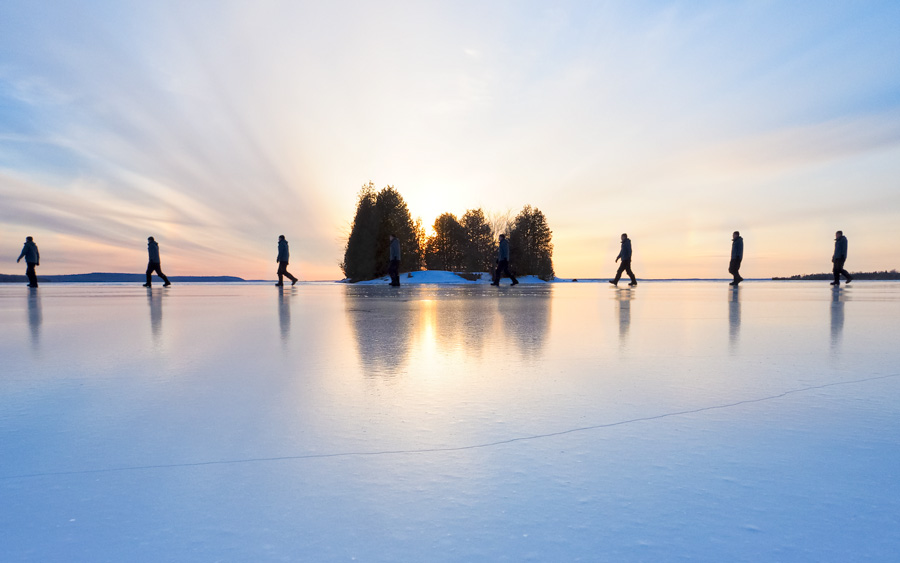 For this image I set the shooting interval at 1 second, walked off and strolled across the frame. I stopped the sequence once I got back to the camera. The individual images were blended together in Photoshop. I hate wasting good light, so I will often shoot with multiple cameras and use the time lapse feature even if I have no intention of creating a time lapse movie.
31 Comments
Joseph McGaw
3/23/2016 12:40:51 pm
Thank you for sharing your knowledge through your blog posts. Your work is amazing. I’m definitely an amateur/enthusiast photographer – kids, wife, family vacation photos. Have Nikon but recently purchased the Olympus OMD E-M5 Mark II and love it – a little overwhelming but light, compact and packed with features. I’m now looking to expand my skills. So, I find myself coming back to your blog often to gain insights on OMD basics, technical aspects of shooting various compositions, inspiration and more. I recently searched google for Astrophotography and Time-lapse. I read numerous blog posts and viewed several YouTube videos but your posts on the subjects are superior. So far, every time I have been able to utilize the knowledge you shared to create images I never thought possible. So, to wrap this up, Thank You. I look forward to your next post. 3/6/2020 01:51:03 am
His videos are amazing. You will record for a long time as you were filming for a movie, with a prominent image quality
Balaji
4/1/2016 07:51:28 pm
I recently got my first olympus EM1 + lens kit and have been experiementing with it. So far there are couple of sites where I get couple of useful info about how to use the equipiment creatively, but your site is where I see both stunning image quality accompanied with explanation of how to achieve it. I think these kind of support sites are doing a great favor for olympus users. Keep up your great work.
Peter
4/4/2016 10:14:24 am
Hello Balaji,
Cyndi
4/5/2016 06:55:16 am
Peter,
Thank you very much, Cyndi. Cheers!
4/5/2016 11:40:53 am
Hadi Widjaja
5/30/2016 04:27:20 am
Very nice post, many thanks for the information, i can learn so much from your explanation here
Peter
1/30/2017 01:55:52 am
I have the EM5MKII and love this camera.
Richard
2/16/2017 05:59:02 am
I just bought a Olympus OMD E M10 Mark II, and of course I would like to tryout the Time Lapse funtion. Now you made it a lot easy me to get started.
Peter
2/16/2017 06:22:35 am
Glad I could help! Enjoy your new E-M10 Mark II and the time lapse feature.
Lin Troski
2/28/2017 01:40:59 pm
Just got my camera, I am hoping I can accomplish something near as good as you have.
Peter
3/3/2017 09:30:31 am
Hi Joerg.
Sjors
3/6/2017 04:33:58 am
Hello Peter,
Toby
6/10/2017 03:45:20 am
Same question here... which mode and settings?
BBLUE
8/31/2017 03:21:30 pm
You make me inspire to take a photo more and more. Thank you very much :)
Bill Kyburz
9/21/2017 09:04:40 pm
Hello Peter, 12/12/2017 02:29:02 am
Babu.K.Selvarajan
1/28/2018 07:50:29 pm
I need to know which is the best way to take a night to day time lapse either it is fully manual or aperture priority.which helps to minimize the flicker & any tips or reference is welcome by me.....
Babu.K.Selvarajan
1/28/2018 08:02:39 pm
Really a nice & useful post for an upcoming time lapse Photographer like me.send some links & useul tips & post pls enlighten me in this field.keep upyour gud work....
Jacob A Schoettle
4/17/2018 05:50:09 pm
How often are you using filters in your timelapses? I know the photo of your EM5 II has a filter on it, do your others? And which is your preferred filter of choice?
Dave Rumball
4/18/2018 06:10:36 pm
Out tonight for a day/night TL. EM5 MkII camera set to Aperture priority (7-14mm @ F2.8). When the sun had set and the moon was visible the shutter speed increased to 8sec and wouldn't go any longer (it blinked and the frames got progressively darker) Is this a function of AP use? 4/28/2018 06:31:50 pm
Inspiring oeuvre! Hope to praise by imitating on my La Cliche Silhouette hike tomorrow.
Liz Price
10/11/2019 04:00:33 pm
Have had an Olympus EM 1 for three years and an EM5 mark 11 for two years. Love them but since adding a macro to my lens collection its opened up a whole new world.so much you can’t sea with the naked eye, especially Lichen and Slime Moulds. Love your interesting articles, and the settings you have used. Would love to learn more night photography. Im in a small senior group and several of us have Olympus cameras so I share your posts. 11/27/2019 02:07:49 am
I want to take a picture of a bicycle, can you help me?
Matt Balogh
6/23/2020 02:48:19 am
Hi there, I am wanting to do time lapse over about 12 hours - how can I keep my Olympus OMD 10 MK ii alive over that period?
STEFANOS APOSTOLIDIS
7/16/2020 10:59:11 pm
Hello, so beautiful! I have one question. In some cases I need to shoot more than 999 frames and I don't find an option for that.
Mark Keil
5/5/2023 04:27:04 am
Thank you for the beautiful sequences and for your clear and helpful explanations. Question: using the time-lapse function allows the preview to be shown for only 0.5s (EM5iii manual, p.131). Is it possible to increase this preview time? 9/14/2023 10:27:56 pm
Blackbox is Australasia's largest and most experienced time-lapse provider. We help our clients document their projects, easily engage with stakeholders and provide better oversight of the projects company wide. Leave a Reply. |