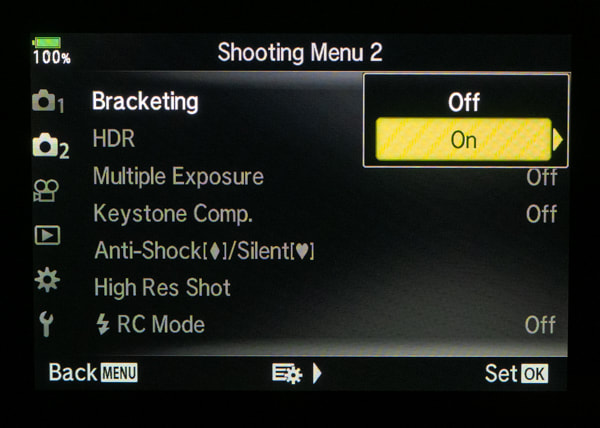
Using Focus Bracketing and Stacking in Landscape PhotographyFocus bracketing and stacking is often considered the purview of the macro photographer since macro lenses have notoriously shallow depths of field. It is used far less often by landscape photographers and that is unfortunate since it can allow you to present the scene in front of you in ways that you could never really see with the naked eye. It is a technique that I am using more and more often in my landscape work. When composing many of my landscape images, my goal is to draw the viewer into the photograph by having multiple subjects framed in such a way as to provide strong foreground and background elements. The image below is such an example. The main subject is the waterfall, while the leaves, log, and rushing water are secondary subjects that add interest to the shot and hopefully lead the eye toward the main subject. 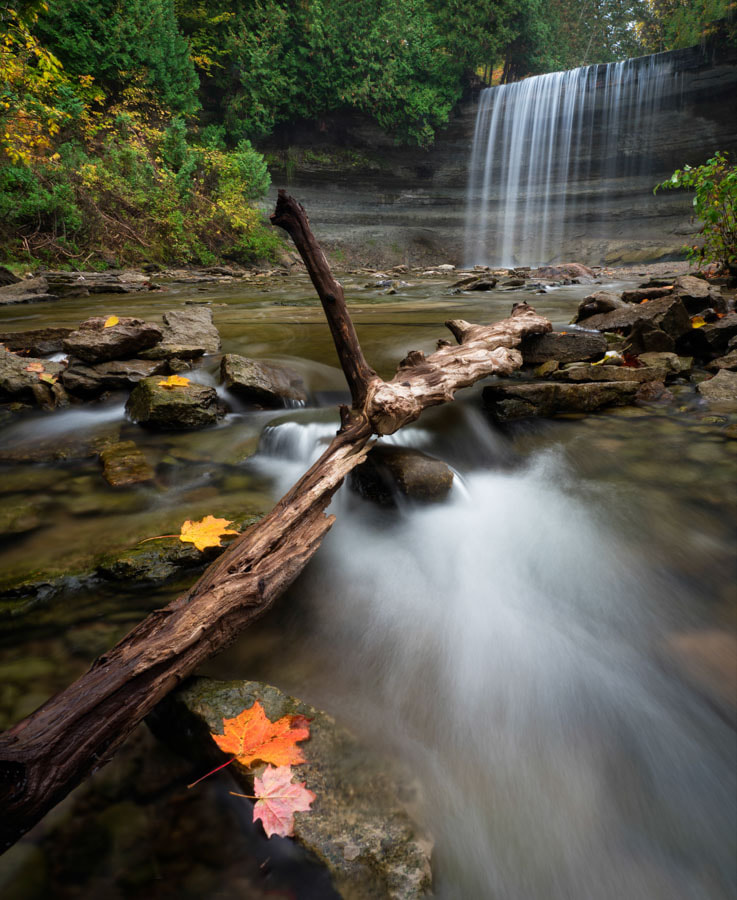 Olympus E-M1 Mark II, 12-100mm f/4 PRO, ISO64, 1s @ f/13 It was important to have sharp focus throughout the image so I positioned my camera about a meter from the foreground elements, focused about 1/3 of the way into the frame and used a relatively small aperture. This gave me the depth of field I needed. But what if I wanted to put my camera much closer to my foreground, let's say a few inches from the leaves. Would I still be able to achieve sharpness throughout the image? Nope! Not in a single shot, even when shooting at the smallest aperture. This is when I turn to focus bracketing and stacking.
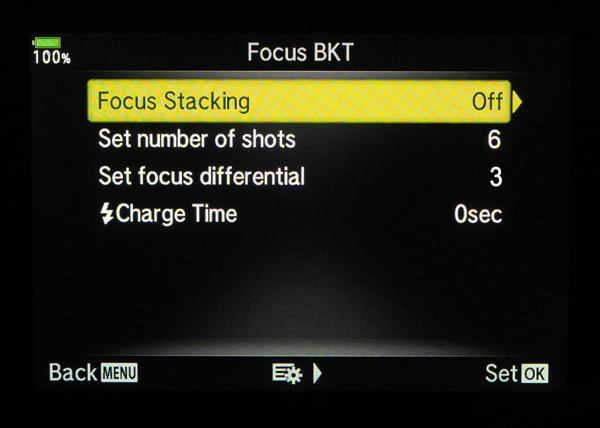
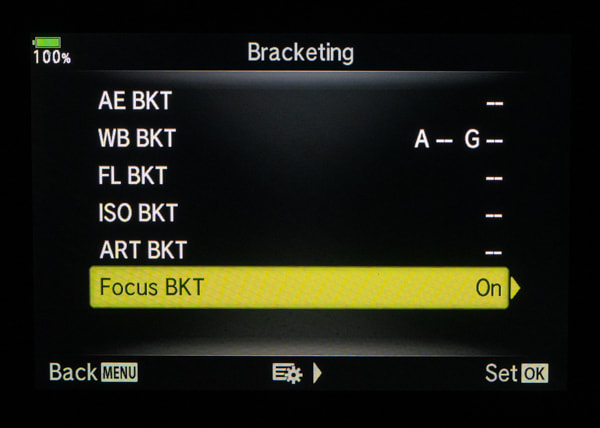
Bracketing vs. Stacking The concept is a simple one. Take a series of images of your scene at different focus distances (bracketing) and blend them together to create greater depth of field than any single image (stacking). The beauty is that with today's cameras you can do all of this with a single press of the shutter release. With the Olympus OMD cameras that I shoot with I can choose to simply focus bracket the images or also stack them in camera. For bracketing you can select from 3 - 999 shots, while in the stacking mode you can select from 3 - 15 shots. Equipment The following Olympus cameras have built-in focus bracketing and focus stacking. Not every lens is compatible with the focus bracketing/stacking feature. Here is the most recent list of stacking compatible lenses (as of January 2020).
A tripod is recommended, however, quite a few of the shots in this post were hand-held while for others I placed the camera on the ground. The Process The following steps will set up the camera for focus stacking.
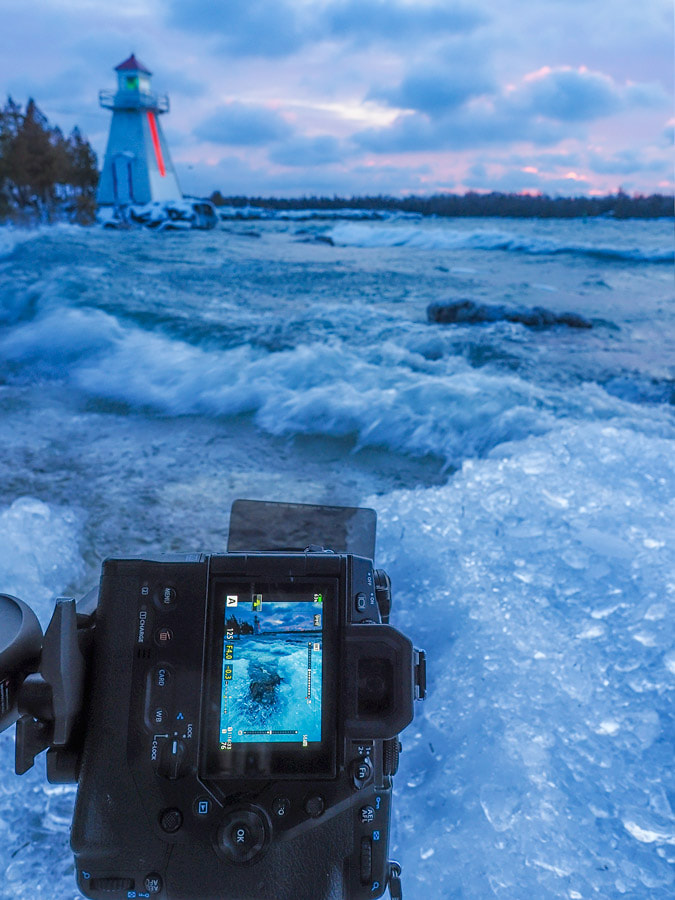
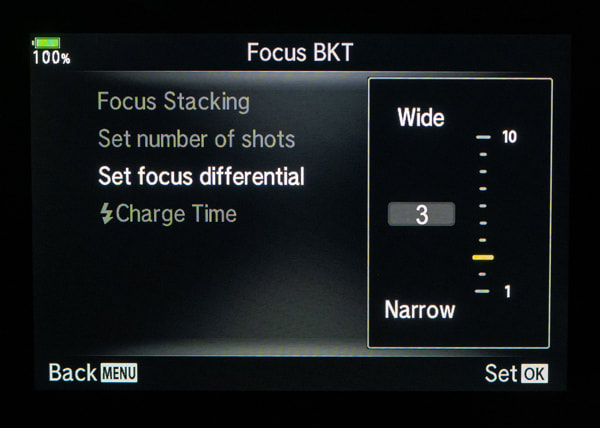
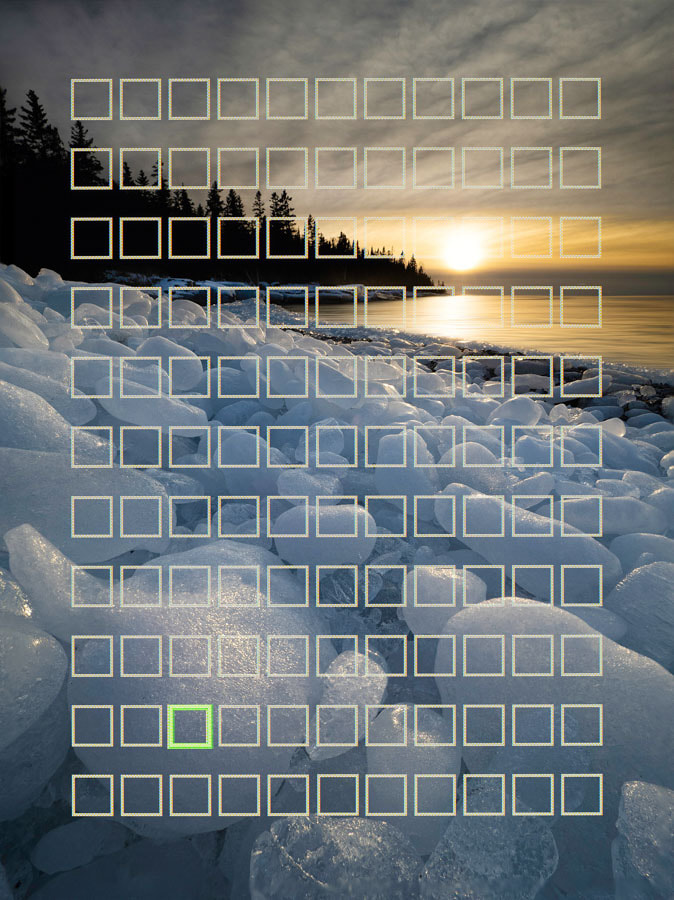
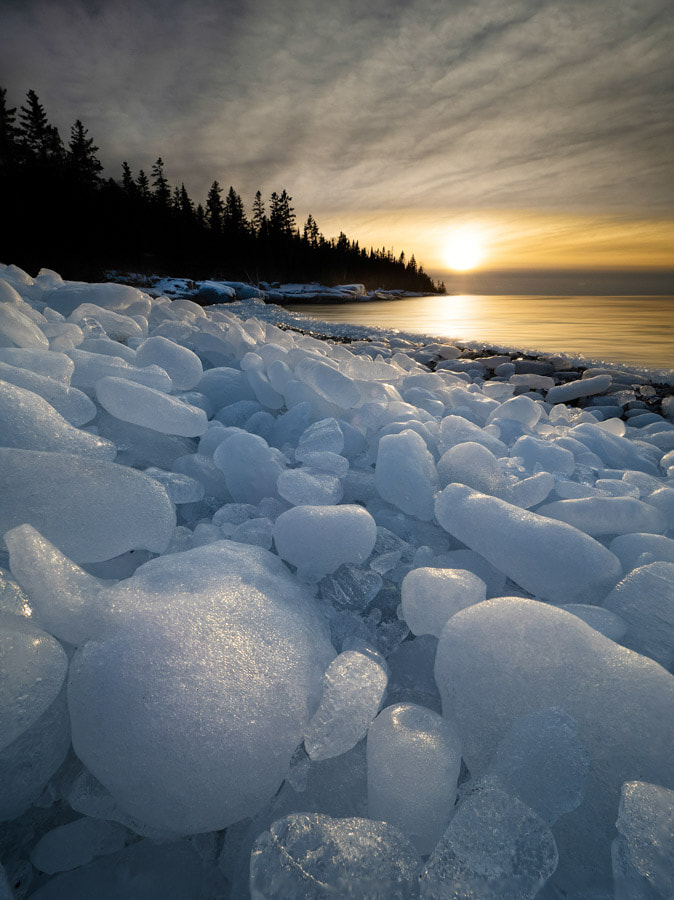
The focus stacking feature will shoot your selected number of photos at the focus differential you set and then merge them into one jpeg file at full resolution. The individual images will be recorded as RAW images (assuming you are shooting in RAW). This allows you to stack them later if you'd like, using third-party software like Photoshop or Helicon Focus. Achieving good results is considerably easier when shooting landscape images when compared with shooting macro since you typically have greater depth of field with a landscape lens. Once engaged, you will see BKT appear on the top of the LCD panel. You will also see a thin border appear when stacking is enabled. Everything outside this border will be trimmed off your final stacked image. This is necessary because as the camera adjusts to different focus points the field of view also changes slightly. Use this border to aid in composing your shot. This guide does not appear when just bracketing is enabled since there is no in-camera stacking going on. 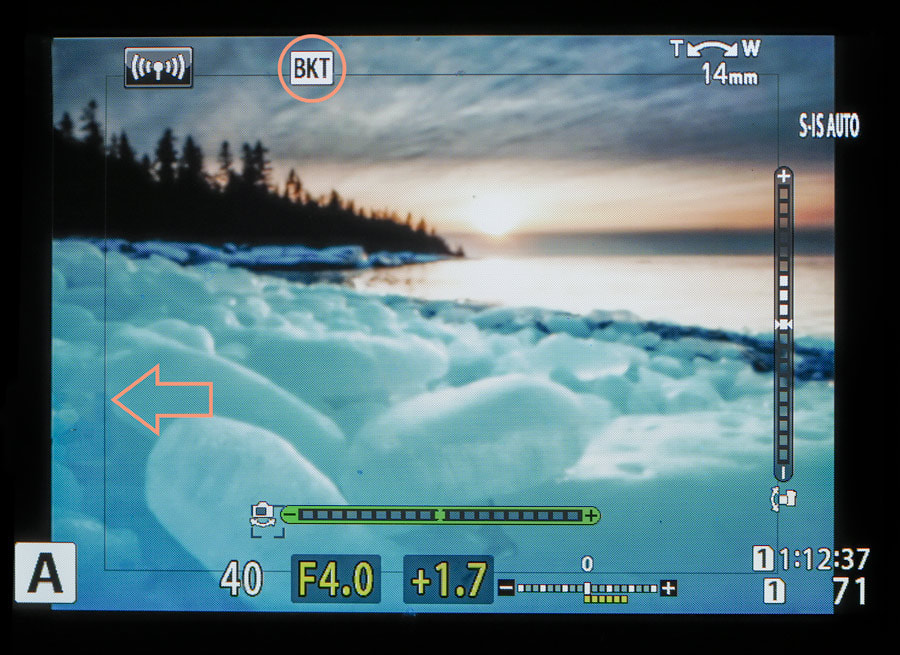 The letters BKT appears when bracketing is enabled. When in-camera stacking is selected a thin border appears. Everything outside this border will be trimmed in the final jpeg image. A Typical Scenario Although the scene may be substantially different from one location to another, the method by which I use focus bracketing/stacking remains fairly consistent. Here is a breakdown of how I go about using this feature. The Situation I opt to use focus bracketing/stacking when the foreground lacks larger points of interest and I want to accentuate the details of smaller foreground subjects like ice crystals, sea shells, small rocks, leaves, flowers, etc. Camera Placement Get in close! I mean, really close. For many of the images in this article the front lens element was about 6 inches away from the foreground subject. Many of these images were also shot in vertical orientation and with the camera tilted down at about a 45 degree angle. This will give me the field of view needed to capture the foreground, horizon and sky. As mentioned earlier a tripod can be useful, but to be honest, the image stabilization of the OMD line-up is so good that I often forego the tripod. Call me lazy! Settings Regardless of which OMD camera body I happen to be using, my goto lens for this type of photography is the 7-14mm f/2.8 PRO. It has a minimum focusing distance of 20cm and a field of view of up to 115°. Mode - Aperture Priority (almost all of my landscape images are shot in A) ISO - 200; Depending on lighting conditions I may increase the ISO, but I never use AutoISO Aperture - usually between f/5.6 and f/7.1 Focus Point - single point, positioned over your closest foreground object Number of bracketed shots - 8; This is usually ample and you could get away with fewer Focus Differential - 3; This seems to be the sweet spot so I never change it. The greater the focus differential setting, the more the focusing element in the lens moves between shots. I am often asked if each FD can be translated into a quantifiable depth of field. The short answer is, no. There are too many variables at play for depth of field - the lens, focal length, distance to subject, and aperture. Change any of these and your depth of field changes as well. I find that a setting of 3 works well, so I leave it at that. So How Does this Work, Anyway? Once engaged, the camera will take the number of shots you have programmed (in my case, 8). The first shot will be taken at your selected focus point. The next two will focus in front of your selected point. The remaining shots will then focus deeper into the image depending on the focus differential that you have chosen. You might ask, why would I focus on the nearest object when the camera automatically focuses closer for the next two shots? I have two reasons; 1) I want to make sure that my selected point is in focus and this guarantees it, 2) the focus points don't go right to the edge of the viewfinder and therefore there may be parts of your scene that are closer to the lens than you can't actually focus on. The situation below might help illustrate the point. I came across this shoreline scene with some very cool 'ice stones' that had been tumbled upon the beach and took this first shot from eye level - no focus bracketing required. 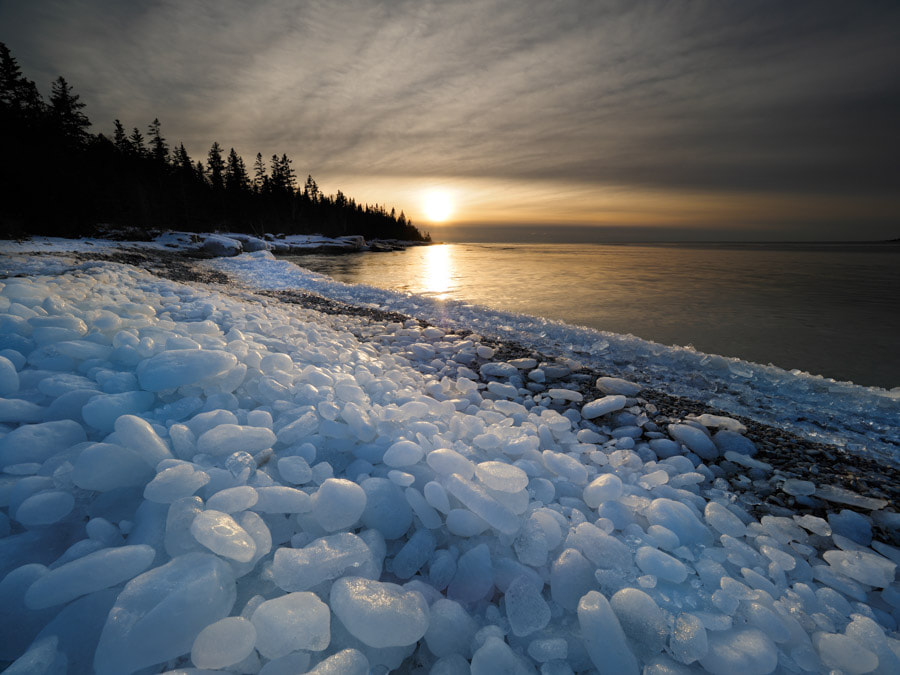 E-M1X, 7-14mm f/2.8 PRO, ISO200, 1/160s @ f/7.1 I then switched to focus stacking, crouched down, got in real close and focused on the piece of ice closest to the lens. Since the available focus points don't go right to the edge of the frame, the fact that the first two shots in the sequence focus in front of your selected shot ensures that the closest edge will be in focus.
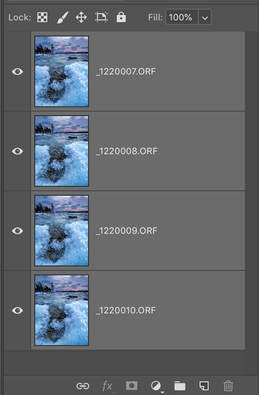
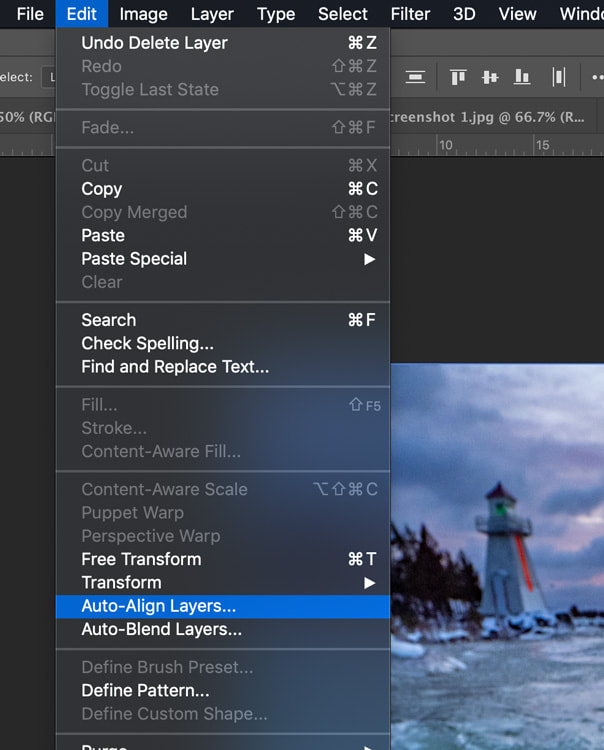
Full Disclosure I love this feature and use it so often that I have my stacking settings programmed into one of the camera's custom modes. The truth, however, is that I rarely showcase the final stacked image created by the camera. I use it as reference, but since I want as much control as possible I individually process each RAW image and then stack them using Photoshop. One thing to be aware of is that, from the set of bracketed images some will be completely out of focus (remember that this feature was primarily designed for macro shooting). I can then eliminate those and only stack the images that are needed. In the example above I only used 4 of 8 images. This gave me the depth of field needed, from a few inches to infinity. Stacking in Post I use Lightroom and Photoshop for most of my editing. Here are the steps I use to create my own stack; 1. Identify the best of the stack. After importing the images into Lightroom I will look through the set of bracketed images and choose those that have at least some part of the scene in focus. 2. Do an initial edit for one image and sync those settings to the remaining images. 3. Select the group of images and 'Open as Layers in Photoshop'. 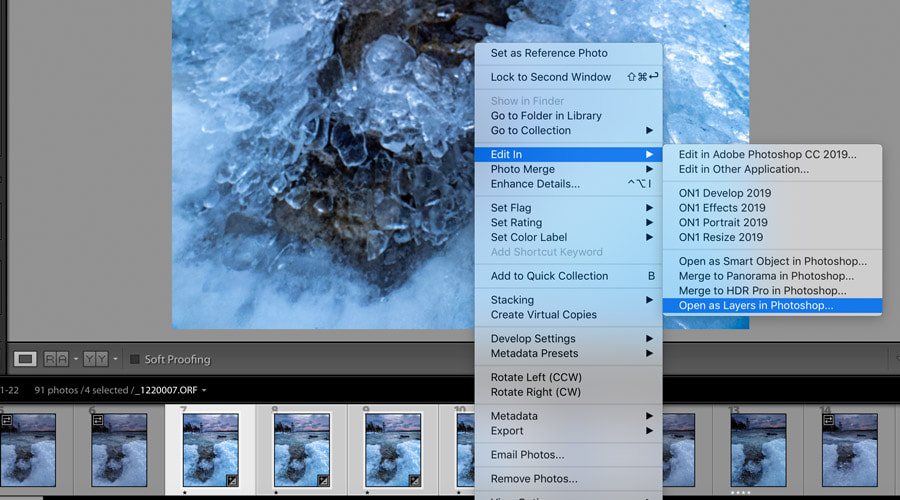 4. Select all of the layers. 5. Go to Edit > Auto-Align Layers... This is an important step since the field of view is slightly different for each image, and, if you're lazy like me and didn't use a tripod, each image will need to lined up properly.
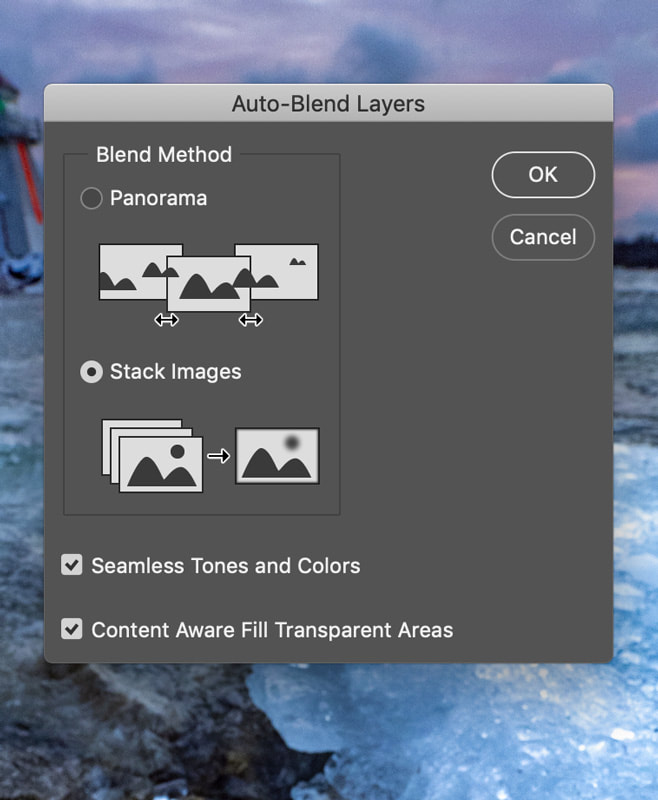
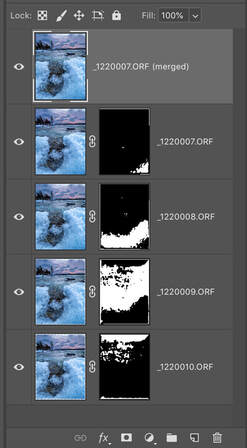
6. Go to Edit > Auto-Blend Layers... Select 'Stack Images'. I usually check 'Content Aware...' as it does a remarkably good job at filling in missing areas. If you choose not to, you will need to crop the image as some of the edge will be out of focus. 7. Delete the masked layers and complete your final edit.
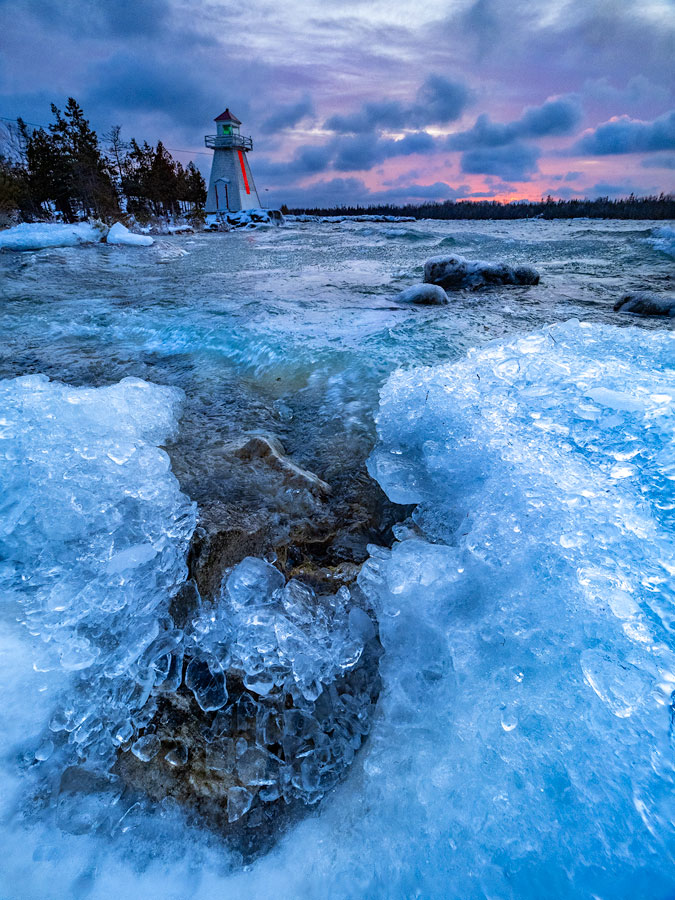
For more reading on focus stacking and bracketing, check out my post that is specific to macro shooting. 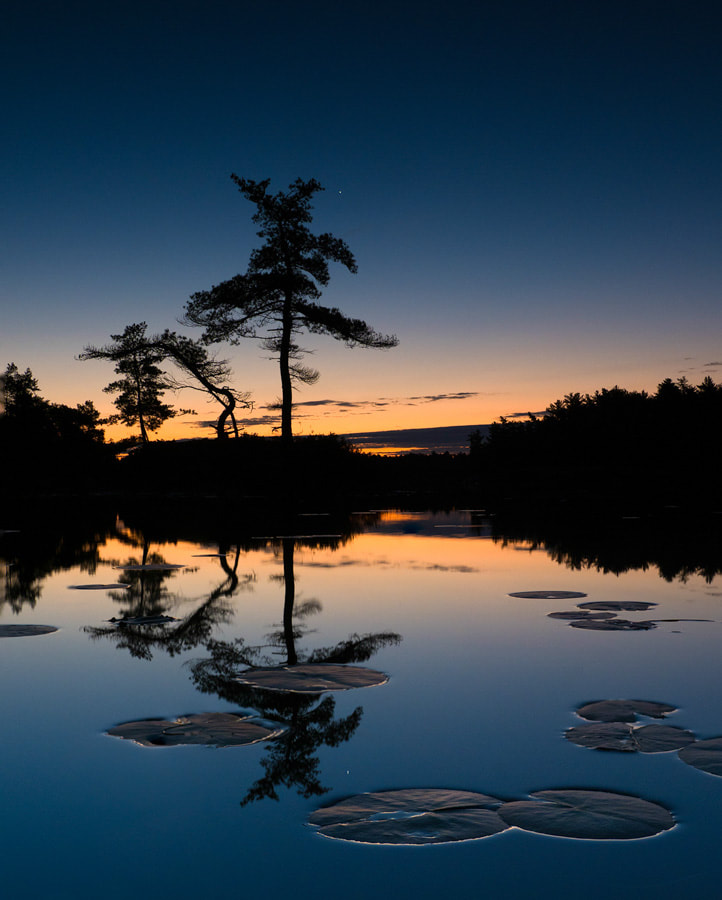 This was one of my first focus bracketed landscape shots and was thrilled to see the incredible depth of field that I could achieve. (Olympus E-M1 Mark II, 7-14mm f/2.8 PRO, ISO400, 0.4s @ f/7.1)  With nothing all that impressive in this location to include in the foreground I opted to get in close and show off the interesting geometry of these ice crystals. (Olympus E-M1 Mark II, 7-14mm f/2.8 PRO, ISO800, 1/50s @ f/6.3) 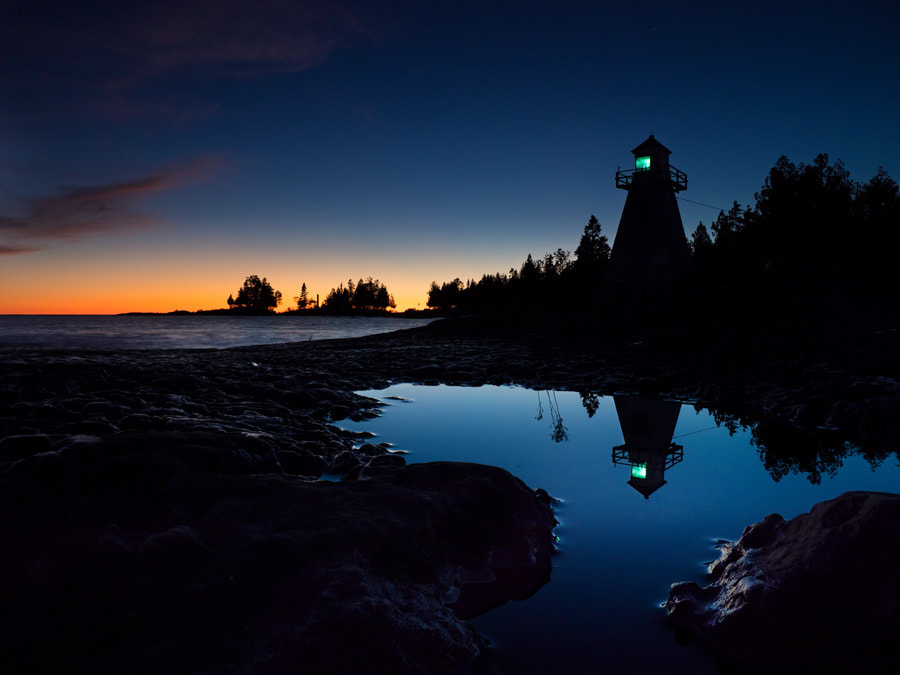 In order to capture the reflection of the lighthouse I needed to put the camera right on the ground and hold it steady during the sequence. (Olympus E-M1 Mark II, 12-100 f/4, 1.3s @ f/6.3) 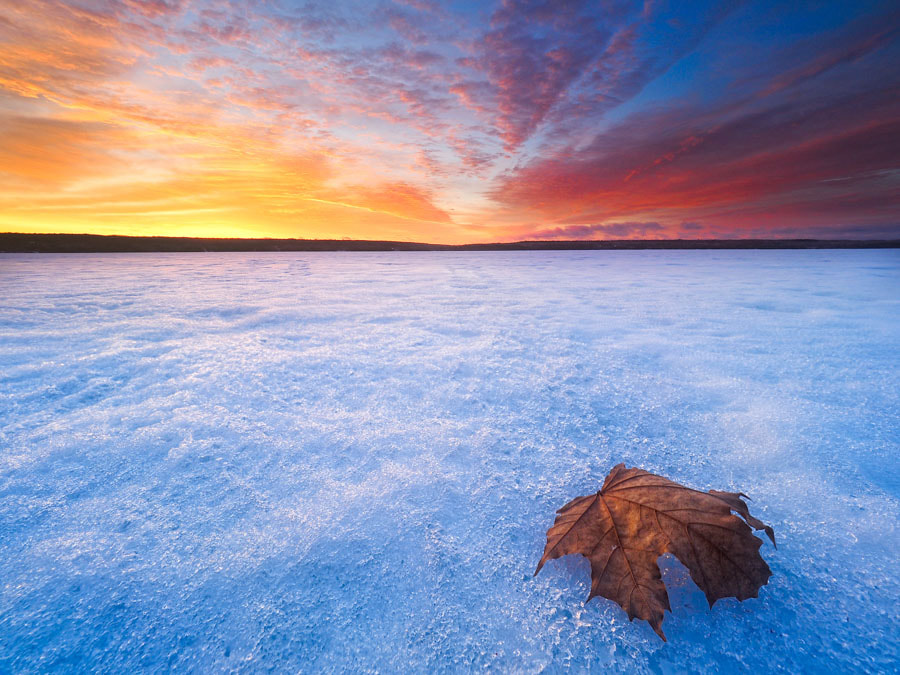 (Olympus E-M1X, 7-14mm f/2.8 PRO, ISO200, 1/15s @ f/7.1) 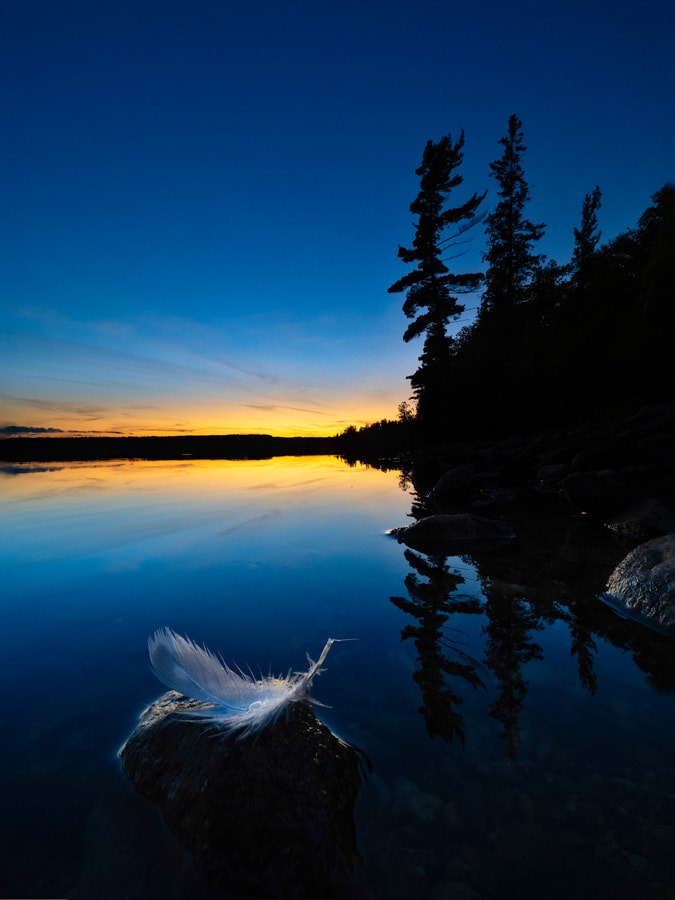 While kayaking on this small lake I pulled ashore to capture the sunset and saw this small feather that I thought would make for an interesting foreground subject. (Olympus E-M1X, 7-14mm f/2.8 PRO, ISO200, 1/13s @ f/5.6) 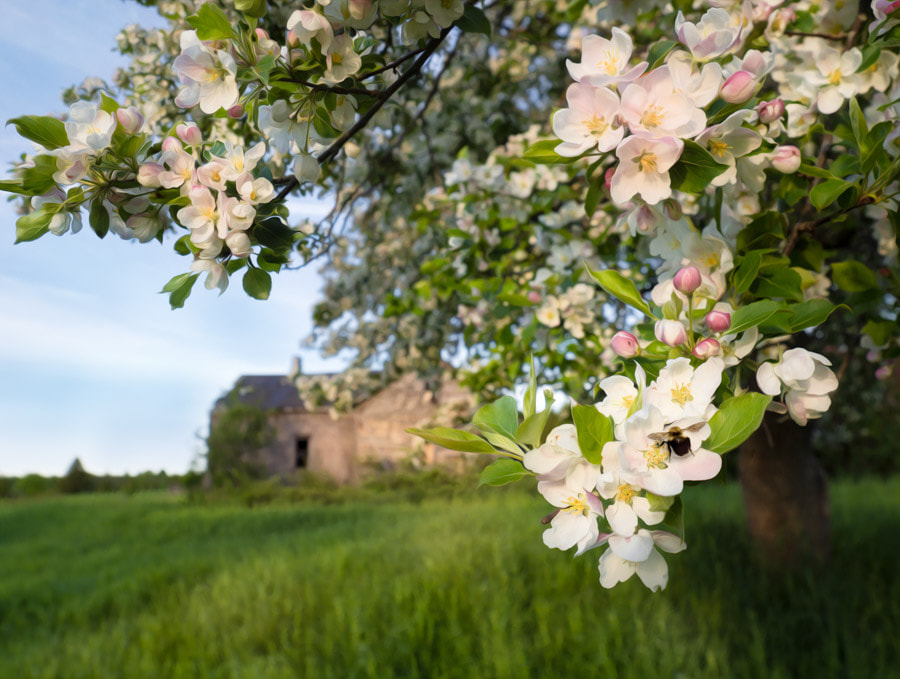 I opted to keep the background defocused for this image by only using a few of the bracketed images. I also had to do some additional layer masking around the bee since it moved in between shots. (Olympus E-M1X, 7-14mm f/2.8 PRO, ISO200, 1/500s @ f/4) 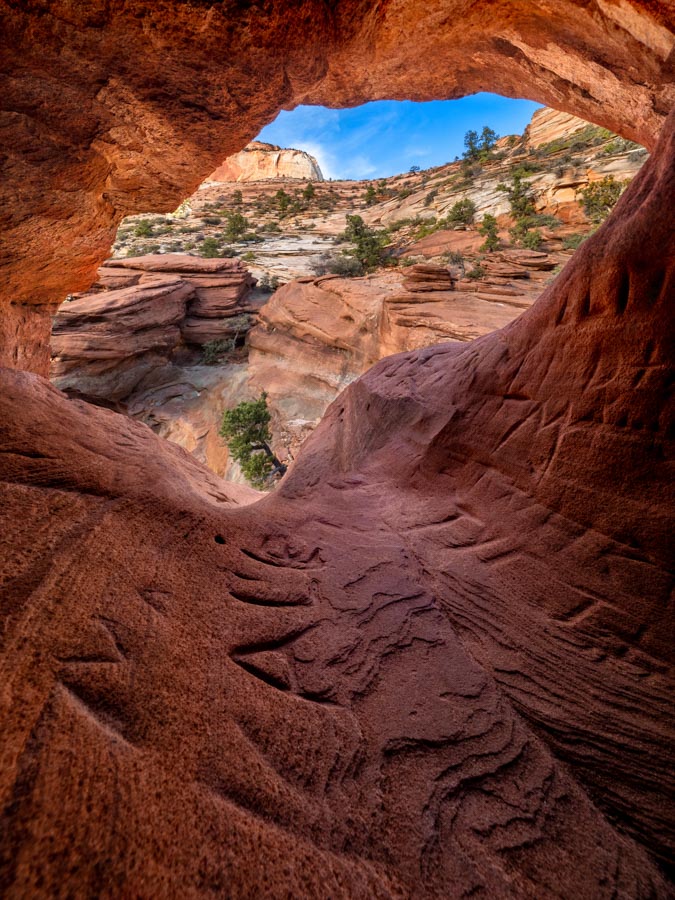 Photographed in a small natural arch in Zion National Park. (Olympus E-M1X, 7-14mm f/2.8 PRO, ISO200, 1/13s @ f/7.1)  It may not look like it, but the crown of this twisted tree was directly overhead. I used a fisheye lens and placed the camera right against the trunk in order to create this composition. (Olympus E-M1X, 8mm f/1.8 PRO, ISO200, 1/50s @ f/7.1) 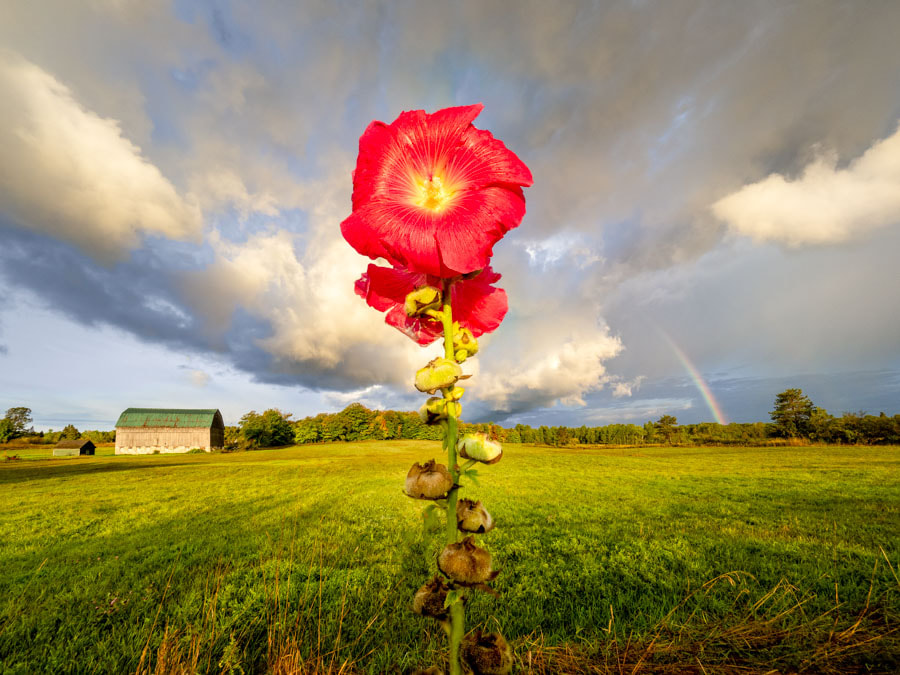 Although I shot a total of 8 photos for this image I ended up only needing 2 of them, one for the hollyhock and one for the background. (Olympus E-M1X, 7-14mm f/2.8 PRO, ISO200, 1/200s @ f/7.1)
20 Comments
Peter
2/1/2020 01:31:48 pm
I'm glad that you found the article useful, Mike. I hope it works out well for you.
Peter
2/1/2020 01:32:25 pm
Thanks for taking the time to read and comment, Helmut.
James Saxon
2/1/2020 01:17:51 pm
Thanks for the information. I was curious as to how this was setup in the camera.
Tim Hanko
2/1/2020 02:19:24 pm
I learn so much from you. :)
Darren Clarke
2/1/2020 07:46:03 pm
Excellent Photos and insight!
Gregory Lee Donoghue
2/3/2020 10:17:13 am
Great article on how to. Wish there was a print version without photos!
Martin Jean
2/7/2020 03:31:29 pm
Thank you very much! I will try this soon along the St.Lawrence River. 3/6/2020 04:07:56 am
Hi Peter, I am very happy that I found your blog and this article. I always wanted to try Focus BKT with my E-M1 Mark II, but now with this informations there is no more excuse not to do it. Very good explained, thanks a lot!
Joyce Niejako
6/5/2020 03:45:48 pm
When you use a tripod what type do you use and, do you use a L-bracket?
Peter van den Broek
8/13/2020 04:33:27 am
hello Peter, as all your articles very well liked by me.
Carl-Göran
10/8/2020 07:13:04 am
Hi Peter,
Doug Chamberlin
11/14/2020 12:52:40 pm
Very glad someone passed on the link to this article. What a great service you have provided to help us get started using this feature of our OMD cameras! 2/18/2021 09:59:15 pm
Hi, Peter! In the BTS picture looks like you are using a 100mm filter system on a 7-14mm lens. I'm wondering how do you avoiding vignetting with wider shooting angles?
Bev Kiecker
8/26/2021 08:56:59 pm
I've been struggling with this feature for awhile! This article is SO helpful! Thank you so much!!
Derek Horsman
8/29/2021 03:57:54 pm
Great tutorial. I've been wanting to try focus bracketing for landscape. I've done it once manually at Mt. Nemo on the Bruce Trail and it turned out well. Had to stack afterwards as it was the EM10i, which didn't have stacking nor did I have a lens that allowed it in camera. But, it definitely helps.
Frank Chaffin
9/9/2021 12:13:04 pm
I've now read and studied this tip and found it to be very helpful in understanding Focus Stacking on my M1.3. But, great information sometimes brings up an extra question or two. (1), when I look at the image files, it's hard to tell which frame is the "finished" one. With my camera set to record JPEG and Raw, there's quite a number of shots.After looking closely, I think it's the first one in the series of exposures, which if so, leaves me a little puzzled because (2) being a "stack" of all frames, there seems to be individual frames with better focus. BTW, I was shooting in the same area of your photos from Zion Canyon. Wonderful area.
Jude
9/28/2022 11:35:57 am
Hi Peter, I just wanted to tell you how much I have enjoyed your amazing photos, videos and articles. And I have learned how to apply some of the parts of Olympus cameras that had been a little confusing. I am working my way through putting that knowledge into practice. I use the OM 1. After a few years of bird photography with the wonderful 300 mm lens, I shifting toward stars and landscapes and an am really enjoying the old primes, the 12, 25 and 75 and having light kit is divine. Look forward to reading and viewing more from you.
David Hearne
2/11/2023 05:20:52 pm
Peter, great article and timely for me as I want a "very near to far" in focus landscape image. Unfortunately, I do not get a far ridge line to come in focus (OM-1 &12-40/Pro, f8) using 8 shots - in camera stack at differential of 3. If I shoot a single shot at f8 and focus 10 feet away, everything is in focus. Any suggestions? Leave a Reply. |