|
Here's a cool (or rather cold) photo experiment that might help you embrace some of the coldest days that winter brings your way. Create some frozen bubbles! 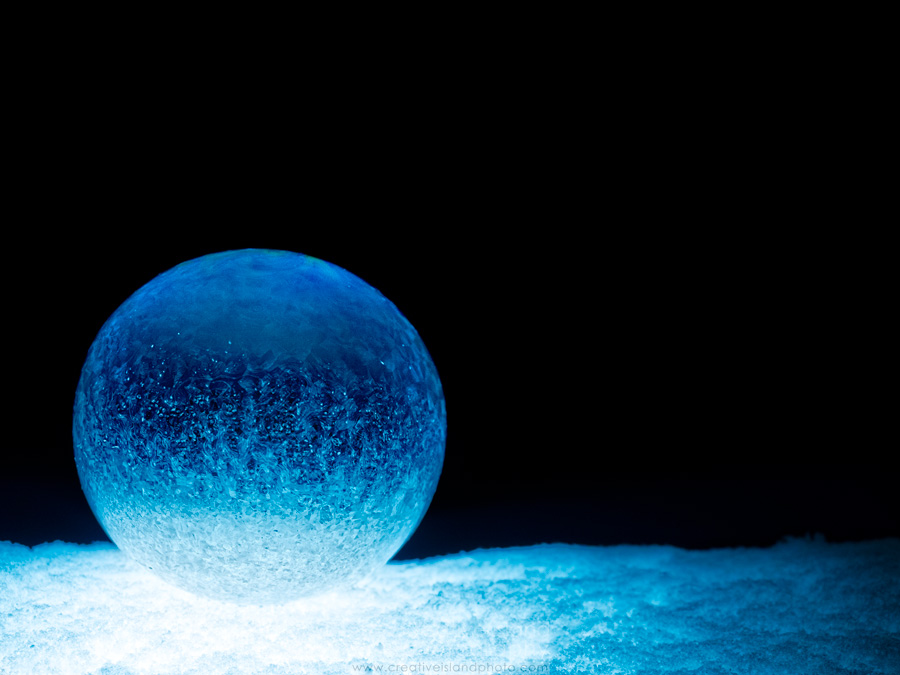 "Crystal Ball" (ISO 400, 0.5s @ f/4.5) Warning! This only works in really cold weather. The photos in this blog were all taken on the same morning when it was -20 C. Ideally, it should be even colder than that! The basic recipe for the bubble mixture is fairly simple and, with full disclosure, this isn't my recipe. I came across it online.
Stir the mixture until all of the sugar has dissolved. Then place in your freezer (or outdoors) until the solution cools and thickens. To blow the bubbles I found a thin tube with a flared end that worked remarkably well. In a pinch, any drinking straw will work. 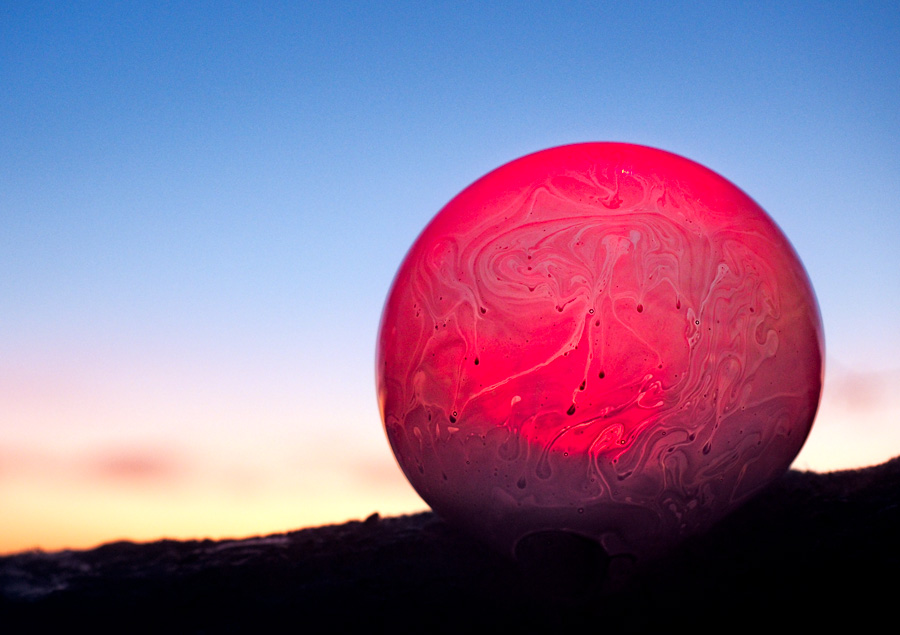 "Blood Red" (ISO 400, 1/125 @ f/4.5) To achieve the red appearance I shone a red LED through the bubble. Now, dress warmly and find a location where you can set up your experiment. I used the snow-covered railing around my deck. This elevated position allowed me to set up my tripod, making composition a bit easier. Also avoid a breezy location since the slightest air movements can pop your bubbles. Expect many of them to burst before you can take your first shot. However, most of my attempts resulted in bubbles that lasted for several minutes. I even had one bubble that kept its shape for over an hour. Finally, based on my limited experience I have found that smaller bubbles (approximately 10 cm in diameter) work better than larger bubbles. Camera Settings The settings you choose will depend a great deal on the lighting and the overall look you are aiming for. I started shooting in the dark and used my headlamp to light up the scene. I usually shoot in Aperture Priority and adjust ISO to ensure I have a reasonable shutter speed to work with. Camera: Olympus OMD E-M1 Lens: M.Zuiko 12-40mm f/2.8 PRO Mode: Aperture Priority ISO: 200 - 400 (Since I was using a tripod for most of the early morning shots I wasn't concerned about camera movement. However the bubble may move quite a bit if there is even the slightest breeze.) Aperture: f/4 - f/6.3 (For most shots I was trying to maintain a limited depth of field with a nice bokeh in the background.) 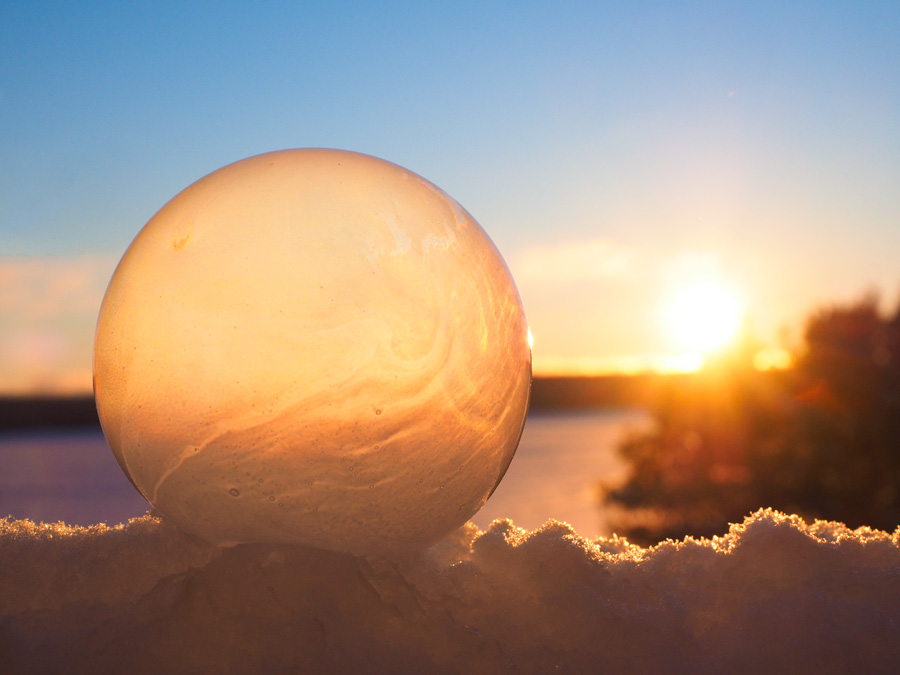 "Golden Orb" (ISO 400, 1/640s @ f/8) As the sun crept up, the air temperature rose high enough that fewer intricate crystals formed in the bubble. Creating the Shot This isn't a blog about composition, but here are some things to consider as you shoot; Lighting: Experiment with different methods of lighting. In the first image (Crystal Ball) I buried my LED headlamp in the snow to create the illuminated effect. Using coloured lamps or glow sticks can also create some interesting effects. If you are using natural light choose your bubble blowing spot so as to provide the best light possible and avoid harsh shadows. The translucent nature of the bubbles is perfect for backlighting. Distractions: Look beyond the bubble and see what else is in your frame. In a few of my shots I ended up having some branches show up in the viewfinder so I adjusted the camera position to eliminate these distractions. Try Multiple Bubbles: If you can get your bubbles to last long enough try blowing several in proximity to each other. Think Big: Not bigger bubbles, but a bigger scene. I am waiting for the next cold day to try this, but I would like to place dozens of frozen bubbles on the snow-covered branches of a coniferous tree. Think Small: Try shooting some macro images of the crystals that form in the skin of your bubbles. Again, this is something I have yet to try, but will definitely attempt in a future experiment.  Time Lapse and Video Unlike watching grass grow, the crystals in the bubbles form quite quickly. Keep shooting and use your images to create a time lapse video. I use the Olympus Viewer 3 software which has a built-in time-lapse feature. Or shoot video and capture the formation. For the time-lapse above I took 96 photos at roughly 1/2 second intervals. Final Words
Although bitterly cold days are not ones that I usually look forward to, I do find myself hoping there are a few more so that I can experiment with this further. If you have tried this and have any thoughts to add - about the recipe, procedure, or anything else, please add a comment below.
6 Comments
Sue
1/21/2016 02:25:17 am
Your bubbles are so beautiful .i have to try this ,not sure it's cold enough in East Sussex though
Peter
1/21/2016 09:55:14 am
Thanks Sue. Even in Canada we are having a milder winter than usual. Not sure if I will get another chance.
Glenys
1/21/2016 03:39:16 am
Beautiful. Thank you for a very interesting blog. I would love to try the but, like Sue, I don't think that it will ever get cold enough here in Essex, UK 1/7/2018 11:45:51 am
Wow! What a nice idea. Will try it right away, we are in very cold days here in Quebec.
Kathy
1/29/2019 04:31:38 am
Well it's 17° at 3:30 a.m. and finally no wind which around here probably won't last long. Tomorrow's temps are to be lower yet but i'm going to give it go and see what happens. Although i'm not overly crazy about going out having to put on multiple layers of clothing but if I can get my pictures to turn out I will be a big hit with my two grandsons who are ten and six. Leave a Reply. |