creative   island   photography
  • Home
  • About
  • Portfolio
  • Order
  • Blog
  • Events
  • News
  • Contact

Astrophotography 101

1/24/2015

21 Comments

 
Space has always held fascination for me. In my youth I loved Star Trek, Star Wars and Battlestar Galactica. I have also lived most of my life in locations with little to no light pollution thereby allowing unencumbered viewing of the night sky. Photographing the stars however has always seemed out of reach. Until now. 

Like many landscape photographers I would turn off my camera when the sun went down. As I strive to expand my knowledge and skills in the craft of photography, shooting at night seemed a natural area to explore. Being a relative novice in this area I quickly discovered that to achieve good results a number of stars must align properly (pun intended). 
Picture
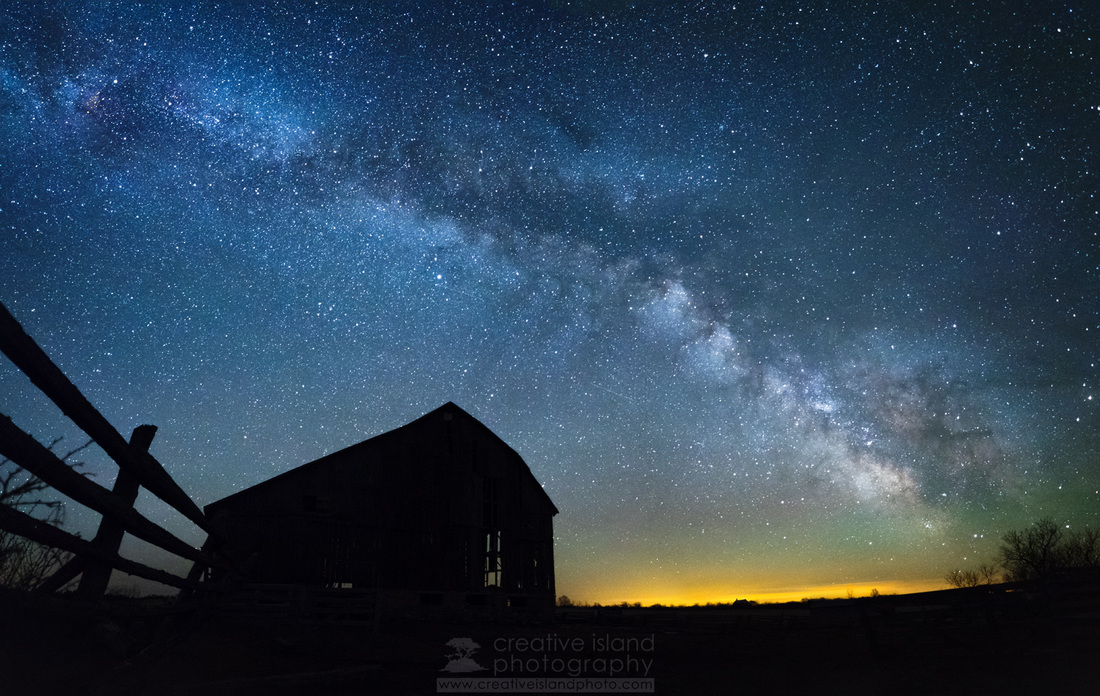
This old barn and fence made for an interesting subject with the Milky Way as a backdrop. As fate would have it, the barn blew down in a wind storm the day after I shot this image. Go figure!
Picture
I had photographed this old shed numerous times during the day, but decided it would make a good subject for a night shot.
Aligning the Stars

Photography and frustration often go hand-in-hand as you try to create the image that you see in your mind's eye. I have had my fair share of that frustration in my night-sky experiments. The following tips might help alleviate some potential frustration for you.

Environmental Considerations
  1. Clear Skies - This may seem obvious but we might as well start with that. I will often plan my night shoots several days in advance by checking the weather forecast (and we all know that meteorologists are never wrong). Humidity can also make a big difference to how many stars show up. The drier air of winter can usually lead to better results than the humidity of most mid-latitude locations in the summer. Don't let a few clouds deter you however. I have often gotten interesting results with a few cirrus clouds in the sky.
  2. Light Pollution - Just over 80% of the population in Canada and the U.S. live in urban settings. This might mean a long drive to find a dark sky area. Even a single street light can obliterate the night sky. Check out darksky.org to find maps of light pollution levels.
  3. "When the moon hits your eye, like a big pizza pie." Moonlight is really just reflected sunlight and can create light pollution that you just can't escape from. I use timeanddate.com to check for moonrise and moonset times and cycles. 
  4. Personal Comfort - Firing off a couple dozen shots during the day may only take a few minutes. The same number might take well over an hour at night. Make sure to overdress for the conditions in layers that can be removed if you get too warm. Night temperatures drop quickly and often dramatically, even in the summer.  For most of the shots in this post I was out in -20 C temperatures for several hours. This was quite manageable with the proper clothing.
Composition
  1. Scout Out a Site - You don't realize how difficult is it to find things in the dark until you're looking. The old shed in the first photo is only about 30 meters from the road, but it is impossible to see in the dark when you are driving down the side road that it is located on. I had to look for a particular shrub that was growing in the ditch in order to get my bearings. 
  2. You've Seen One Milky Way, You've Seen 'em All -  Great landscape images are often about the point of interest that the photographer chooses to include in their photographs. For example, I tell my photography students that it is not enough to snap a picture of a beautiful sunset unless you have something that will engage the viewer and keep their attention. This is even more important for astrophotography. The Milky Way hasn't changed much over the past few million years. What can change is your presentation of it.  Include an interesting foreground element, but keep in mind it may lose a lot of its dimension under darker skies. 
  3. Panoramas - I remember my first time shooting at night, craning my neck back and just absorbing the beauty of that expansive star field. Then I took my first shot and was disappointed that my wide-angle lens wasn't showing enough of it. Now I will take several shots and stitch them together in Photoshop. (see my previous post)
  4. Light it Up - A good flashlight or headlamp is essential and can serve several purposes. While my eyes adjust to the darkness, my headlamp helps me find my location and set up my tripod. I use it to help adjust camera and lens settings and more importantly I use it for a bit of light painting over my foreground subjects. Many headlamps have a red LED setting. This is because your night vision requires time to adjust and is reset every time you view white light. The rod cells in your eyes are quite sensitive to light (cones see colour) but are much less effected by red light. 
Picture
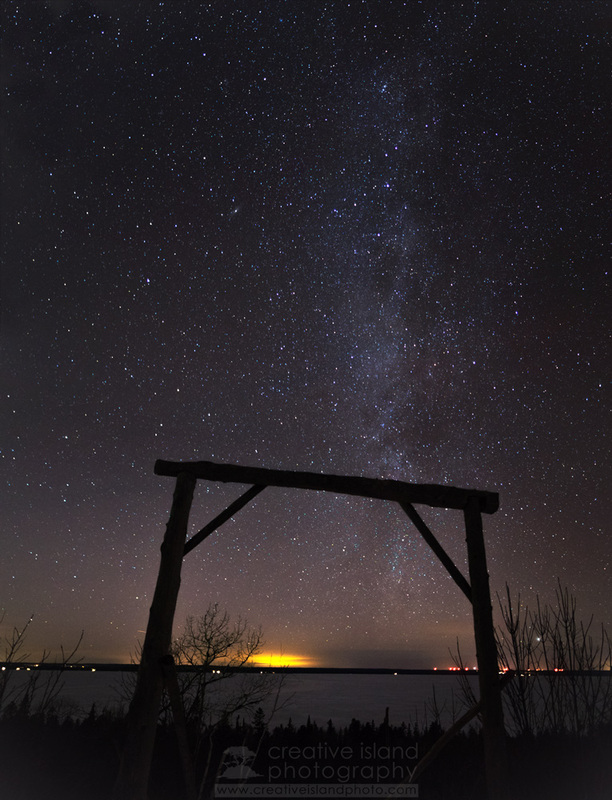
A bit of light pollution off in the distance can add an interesting glow to your shot.
Picture
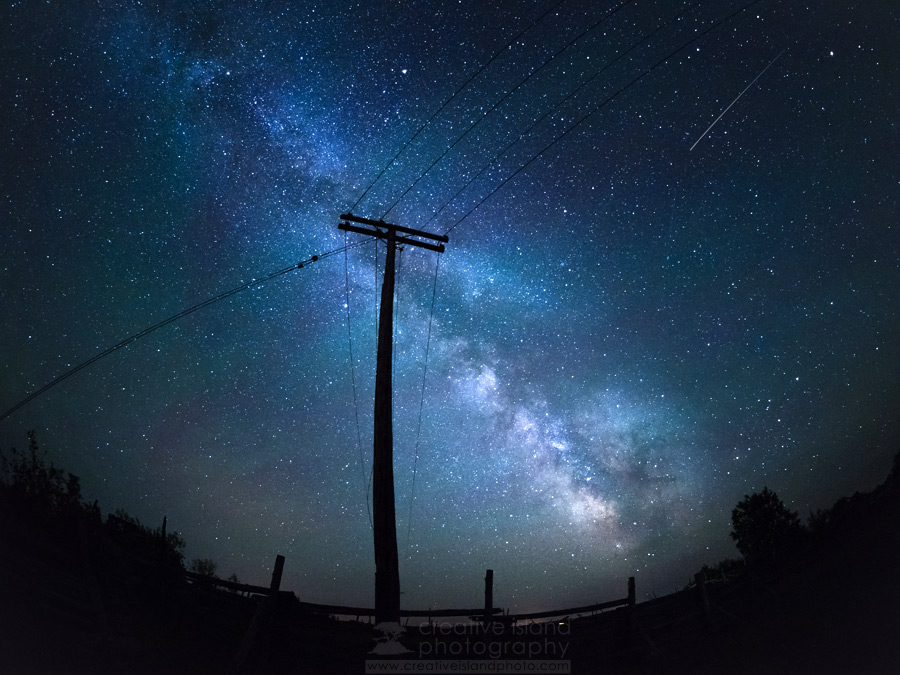
Composing a shot in the dark can be quite a challenge. I ended up recomposing this scene about a dozen times before I was happy with it. My reward was a shooting star! Camera - Olympus OMD E-M1 Lens - Olympus 8mm f/1.8 Fisheye Setting - ISO 1000, f/1.8, 20s
Picture
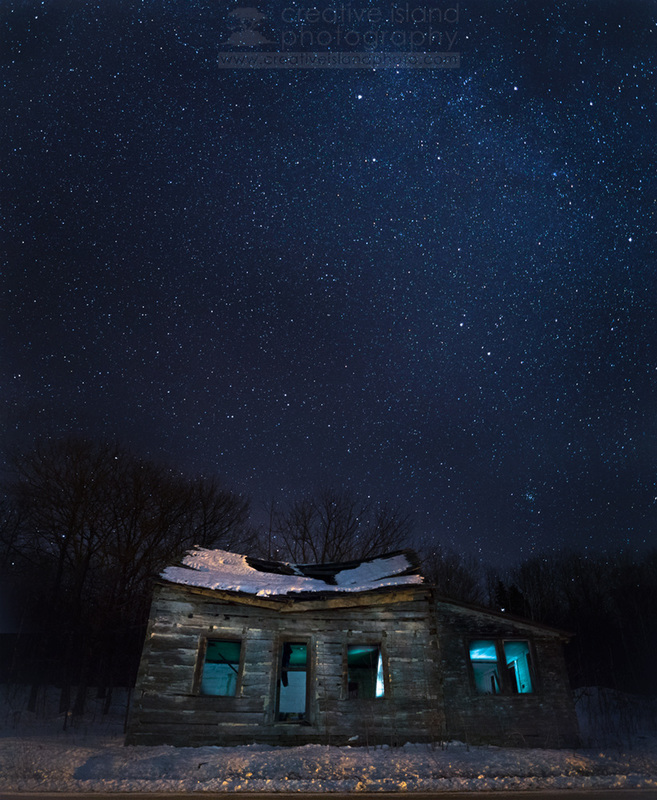
For this shot I set up my camera with a 12-second delay and a 25 second exposure. This gave me enough time to get inside this old house and do some quick light painting. I then brushed the outside with a bit of light from my headlamp.
Camera Settings

  1. Set Up Before You Go - Considering your eyes will require time to adjust to the darkness in the field it is easier to adjust your camera settings before you head out or while you are still in your vehicle.
  2. Shoot RAW - Most amateur and many enthusiast photographers are quite content shooting jpegs. For astrophotography you definitely need to make the jump to shooting RAW. This allows the greatest amount of flexibility when post-processing your shots. Think of RAW files as your old film negatives and jpegs as the prints from the photo kiosk. Having good negatives allow you to print photos with subtle changes in processing. 
  3. White Balance - Every light source produces a colour cast. Your WB setting helps correct for this. I usually set a custom white balance (CWB) of 3600 - 3800 Kelvin. White balance, or colour temperature as it is also called, is based on the range of colours that a strip of platinum goes through as you heat it. It is measured using the Kelvin temperature scale. If you prefer to use one of the programmed WB settings I recommend Tungsten (or Incandescent). They will give your night sky a pleasant blue tone. Of course, if you are shooting RAW you can adjust this on your computer during post-processing.
  4. Lens Choice - In order to capture as much of the night sky as possible, go wide. Most wide-angle kit lenses can give good results. Set to their smallest focal length they will also have a larger aperture and therefore can gather more light. The average kit lens can open up to about f/3.5 which will yield acceptable results. For my nightscapes I use either the Olympus 12-40mm f/2.8 PRO lens or the Olympus 12mm f/2.0 lens. The extra light gathering capability of a faster lens can make a big difference to overall exposure and clarity. 
  5. Focusing - Go Manual. Imagine focusing your lens with your eyes closed. That's what you are asking your camera to do in the dark. The stars are too faint for the auto-focusing to work effectively. Switch to manual focusing and set your lens to infinity. On many lenses the focusing ring can turn past infinity. This helps protect the mechanism inside during fast auto-focusing. Make sure that you check that you are lined up with the centre of the infinity symbol. 
  6. Aperture - "My gosh those stars are far away. I better use the smallest aperture possible to get the greatest depth of field." Nope! Only half of that statement is correct. The stars really are far away, but to your lens they are simply small points of light all on the same plane. Selecting a large aperture (f/2.0, f/2.8, or f/3.5) will ensure that your lens will gather as much of that light as possible in the shortest amount of time. 
  7. Shutter Speed - During the day we are usually measuring shutter speeds in very small fractions of a second. But at night you are fighting against two challenges: the very small amount of available light coming from those distance stars and the spin of the earth. It was only when I started experimenting with astrophotography that I realized just how fast the stars move through the heavens. Set a shutter speed that is too long and you end up with blurry stars, instead of nice sharp pinpoints of light.

    With my lenses, at a focal length of 12mm, I know that I can set a maximum shutter speed of 20 seconds before the movement of the stars becomes too noticeable. For your lens and camera combination use the 500 Rule to determine the maximum shutter speed you can use. The 500 rule is fairly simple; divide 500 by the true focal length of the lens you are using and this will give you the maximum shutter speed before star trails will become noticeable. The TRUE focal length refers to the full frame equivalent of the lens (or 35mm SLR equivalent from the film days). This will depend on the crop factor of the camera sensor. The crop factor for most Nikon cameras is 1.5x, Canon is 1.6x, and micro4/3 is 2x. 

    For my Olympus E-M1 and 12mm lens combination the calculation works as follows: 
          500 / (12mm x 2) = 20.8 seconds
    Therefore a shutter speed of 20 seconds should result in sharp stars. Some photographers prefer using 400 in the calculation to ensure better results. 

  8. ISO - The final part of the exposure triangle is camera sensitivity or ISO. The higher the ISO, the more sensitive to light the sensor is. Unfortunately a higher ISO also results in more noise or graininess. Improved sensor technology has dramatically reduced the amount of noise when shooting at higher sensitivities. I typically shoot between 3200 and 6400 ISO. If noise becomes too big an issue in your images try shooting at 1600. It's amazing how much detail can be pulled out of an image that appears underexposed.
  9. Noise Reduction - Dive into your camera menu and ensure that noise reduction is turned on. All of that graininess that I just mentioned will be reduced significantly. You will notice however that a 20 second exposure takes twice as long. This is because your camera is taking a second photo with the shutter closed (a dark frame), seeing where all the noise is and then subtracting it from the original shot. It slows the photographic process down, but the results are worth it. There will still be some noise left on your image but that can be reduced using software. 
  10. Test Shots - I will finish off by starting again - with composition. Once everything is set I take a few test shots. This is mainly to see whether my horizon is level and if my foreground subject is framed properly. To speed this process up a bit I usually dial back my shutter speed to 10 seconds. I'm not looking for a well-exposed image, just working on framing the shot to my liking. 
Picture
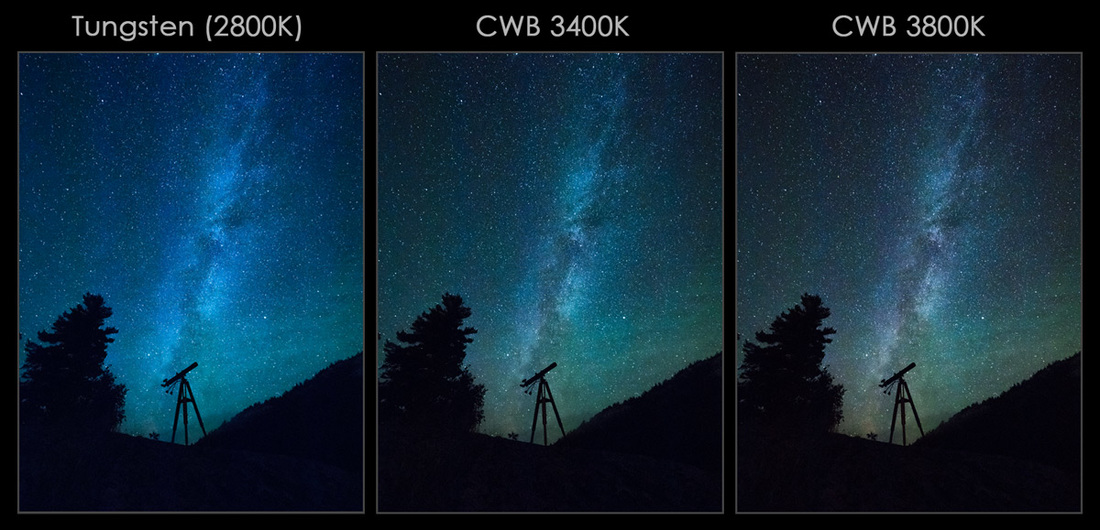
The differences in white balance settings may be subtle but you can see a definite blue colour cast in the first image. I prefer a custom white balance setting of 3400K - 3800K. It keeps the sky dark but still has a pleasing colour to it.
Picture
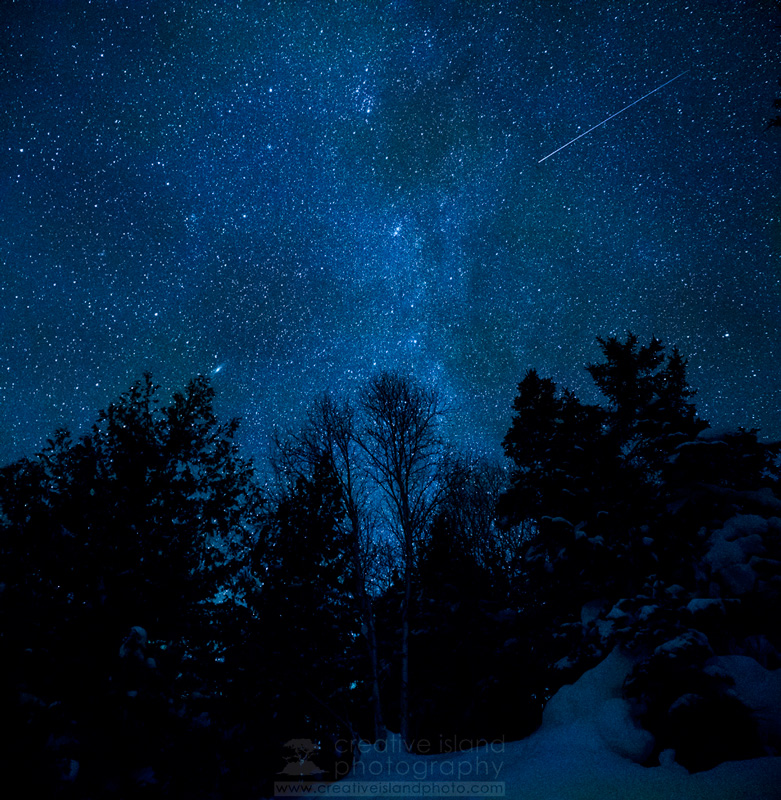
It's not unusual to capture a shooting star during a long exposure.
Checklist
To summarize that rather long list here is a much shorter checklist that I run through.
  • Tripod (I use the Manfrotto 055 Carbon Fibre tripod)
  • Headlamp
  • Lens: wide-angle
  • Focusing - Manual, set to infinity
  • Aperture: as large as possible (f/2.0 on my 12mm lens)
  • ISO Starting Point: 1600 - 3200
  • Noise Reduction: On
  • White Balance - Tungsten (or 3600K - 3800K)
  • Shutter Speed - 20 to 25 seconds for my camera-lens combination
  • RAW
  • Do I know where I'm going and can I find my subject when I get there?
  • Did I tell my wife how long to wait before sending out the search and rescue team?
21 Comments
Rita Gordon link
4/23/2015 01:23:37 am

Love, love, love your night time photography. Your talent is amazing, we are huge fans of your work and since we have a dark sky preserve would like to collaborate with you. We need to talk, are you available to come for coffee sometime?

Reply
Sharon
8/15/2015 10:39:39 am

Thank you. This has helped it make more sense. No points for guessing what I am off to do on the next clear night!

Reply
Mark
9/3/2015 10:52:27 pm

This article is a big help to me. I'd like to try some astrophotography at the Grand Canyon. I have an EM1 and 12-40mm f2.8 lens. I can't tell which shots you may have used the 12mm prime vs. the 12-40mm zoom. For the zoom, in order to keep the speed less than 25 secs to avoid blurring, you would need ISO around 6400, right? Did you find that the EM1 shots were acceptable with this combo?

Reply
Ian
11/1/2015 02:52:36 pm

I would leave in camera NR off and do it in post. Can save a lot of time in the field.

Reply
Peter
11/1/2015 03:34:06 pm

Thanks for the comment, Ian. I certainly don't disagree, but for many people just getting in to astrophotography I think it is simpler to let the camera handle the noise reduction. Cheers!

Reply
Thorsten
1/6/2016 05:26:19 am

Thanks for this Post. It's an awesome guide for me because I haven't done any Astro shots yet, but while reading this post I directly double checked the weather conditions here in Germany. Time for some clear nights here ;)

Thorsten

Reply
Peter Baumgarten
1/6/2016 08:41:05 am

Hi Thorsten,
Thank you very much for the compliment. Glad that you found the post useful and I hope you were able to get some good night-sky shots. Cheers!

Reply
Tobias W. link
9/18/2016 02:05:16 am

Hey there,

thanks for sharing that much information to get started with astrophotography using the Olympus gear, I took a lot of value out of your posts.

One thing I haven't figured out though is how to focus the Olympus 12mm f/2 lens to infinity in complete darkness! The autofocus won't focus to infinity in darkness when it cannot find something to focus on. In manual focus mode (not using the mechanical setting on the focus ring), turning the ring all the way won't focus to infinity. Using the mechanical ring setting I couldn't find where to turn the ring, so it focusses correctly to infinity. All shots I tried had the background at infinity out of focus. Any idea?

I ended up using my old 12-60mm f/2.8-4 FT lens on the EM-1. That's also difficult to focus to infinity in darkness, but it works better.

What I don't understand is why the firmware in the Olympus doesn't focus to infinity by default when the camera cannot find a focus to work with. That would solve all issues.

Reply
Peter
9/18/2016 09:33:42 am

Hi Tobias,
Here is a quick workaround. When you turn the EM-1 on, it automatically sets the lens at infinity (assuming you are in S-AF). Before your press the shutter release use the SuperControl Panel to set the camera to MF and it will keep it at infinity unless you accidentally move the focusing ring.

I always carry around a headlamp when I am out shooting at night and use the clutch to focus on infinity (i.e. the centre of the infinity symbol).

I hope that helps.

Cheers!

Reply
Tobias W. link
9/20/2016 04:58:39 pm

Hi Peter,

I'll give it a try based on the lens reset. The clutch is not precise. Setting the lens to the center of the infinity symbol does not focus to infinity on my sample. I think the manual clutch can only really be used when zone focusing stopped down.

thanks!

David Runyard
9/3/2018 02:52:32 am

This only works (on the E-M1) if <Reset Lens> is set to 'ON' (<Gear> <A> <Reset Lens>)
Another method is to focus on infinity in Manual mode during daylight, flip the clutch back to Auto and continue shooting, then when you want to shoot in the dark flip the clutch back to Manual and it will be focused on infinity unless you happen to move it while flipping the clutch ring.

JOSE ZARCOS PALMA
12/8/2016 06:32:55 pm

Dear all
I faced the same focus to infinite probelm many times during my night shots..then I came up with a fix that works for me since,
During the day I put my Oly in a tripode in Manual focus pointing a distant target.
When I find the optimal position mark it with a ordinary pen in the focus ring and that´s it..at night is just a matter to came back to this setup.
Hope it helps

Reply
Kerren
11/4/2018 01:00:17 am

That's really helpful, Jose. Thanks

Reply
Reid
9/17/2017 02:02:07 pm


Awesome article Peter. I know it's an older one, but still amazing !

I've been kinna frustrated lately with the E-M1. Even shooting at 1250 ISO, there's such a nasty greenish tinge. I forgot to set it to the CWB, but shoot RAW obviously. I was attempting a time lapse, so I didn't want to use NR. I wish I could afford the new MKll, but I just got the 7-14 PRO on top of the 12/2, so my wife has cut me off. I've been thinking of selling the E-M1 and getting an E-M5 MKll. Is it noticeably better ? Only issue for me would be having to give up the 50/2 & FT Panaleica 25/1.4 ☹️

Thanks, any tips are much appreciated!

Reply
Walter Meissner link
12/12/2017 11:21:39 pm

Peter,

There is a chance that your area might have clear skies on Wednesday/Thursday, Dec 13-14, 2017.
If so, Geminid meteor shower will be at its peak.
They are slower moving meteors with a greater frequency at up to 100/hour.
The Geminid radiant will be close to the star Castor, part of the Gemini constellation.
At 9pm on Dec 13, it will appear looking East at an altitude of 30deg. Some meteors may already be appearing at a slower rate.
By 2am on Dec 14, it will appear looking Southwest, with Gemini above the Orion constellation.
The peak will be around midnight or a bit later.
The thin 13% crescent moon won't rise until 3:35 am, a plus.
Perhaps using Live Composite with your favorite background will result in a superb photo.
Start looking at about 9pm.

<http://wwwcdn.skyandtelescope.com/wp-content/uploads/GEMINIDS-2-am-STv2.jpg>

Regrettably my area will be clouded over with snow on Dec 14.

Walt

Reply
Andrea
2/22/2019 04:58:50 pm

Hi Peter , thank you for the great post.

I just have a question: when I shoot on a tripod do I have to disable the image stabilizer, to avoid some shakeing derived from the stabilizer not understanding that the camera is on a tripod?

Thank you,

Reply
Peter Baumgarten
2/22/2019 05:39:34 pm

Hello Andrea,
Generally speaking it is standard practice to turn off the IS when shooting on a tripod. With Olympus cameras you don't need to do this because of the in-body IS. I never turn mine off.

Reply
Andrea
2/23/2019 06:02:40 am

Thank you Peter. I asked because in my old Canon 5d Mk2 I usually disabled the IS on the len on a tripod. And I was curious to understand if there is this need in with olympus and in body IS. Thank you for your answer.

Andrea
2/23/2019 06:08:37 am

After my previous replay, I checked my omd em5mk2 manual and, at page 57, it suggests to "When using a tripod, set [Image Stabilizer] to [OFF]." Just for information.

Barry
9/13/2019 11:38:52 am

Thanks for the tutorial. Do you use dark frame subtraction even if you are going to stitch a panorama?

Reply
Pete Coady link
11/21/2020 08:25:52 am

Hi Peter!

Catching up on your blogs. I follow your Instagram and FB as well as your work with Olympus. All great and thank you.
I wanted to share with you an App I found for prepping for astrophotography called “Clear Outside”. It really takes the guess work out of whether conditions are good and works where ever you are. Check it out.

Take care,
Pete

Reply


Leave a Reply.

    Author

    Peter Baumgarten is a professional photographer and educator. He is also an Olympus Visionary and NiSi Official Photographer. 

    Categories

    All
    Astrophotography
    Behind The Photo
    Personal-thoughts
    Photo Projects
    Reviews
    Tips And Techniques

Proudly powered by Weebly
  • Home
  • About
  • Portfolio
  • Order
  • Blog
  • Events
  • News
  • Contact